
Pattern Reviews, Sewing Hacks, Tips & Free Patterns
The Sewing Blog
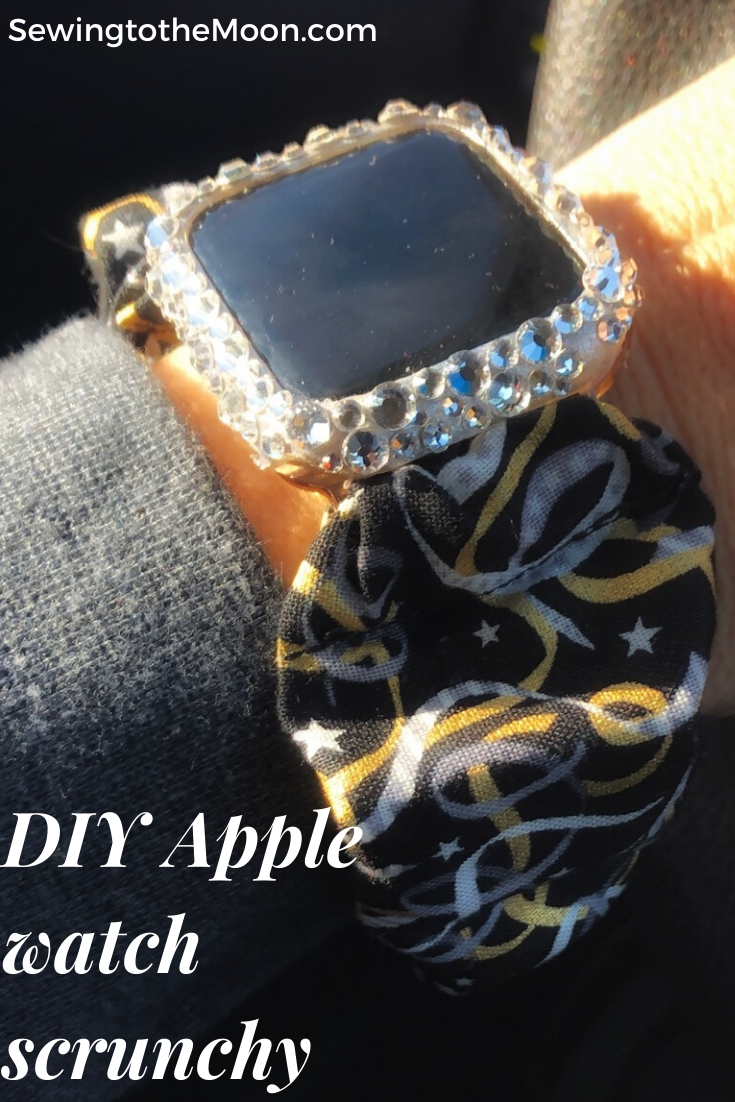
Apple Watchband Scrunchie DIY
DIY an apple watchband or smart watch wrist scrunchie.

Now that the holiday hustle is over, life can get back to normal. Whatever "normal" is, right?
Happy New Year!!
Do you make New Year's resolutions? I do easy ones. I tell myself I'll make dinner 5 nights a week, exercise more, give one room a make-over (the main bathroom), simple and doable things. And of course, I fell off the wagon 2 months in. LOL Ahh... life.
Anywho, what fun things did you give and receive for the holidays??
Perhaps you or a loved one received an Apple watch? If so, I have the perfect tutorial you need to scrunchify that watchband. Scrunchify is a technical term btw. ;)
Before we dive in I want to say this is a perfect scrap-buster project. Yay for those! You just need a strip of fabric, no stabilizer is needed. This is meant to be floppy.
As far as fabric choices, choose something with a small print or a solid. I have made them with knit, quilting cotton, and shirting, they all seem to work great. So, be creative and have fun!
Supply List:
1/4" elastic
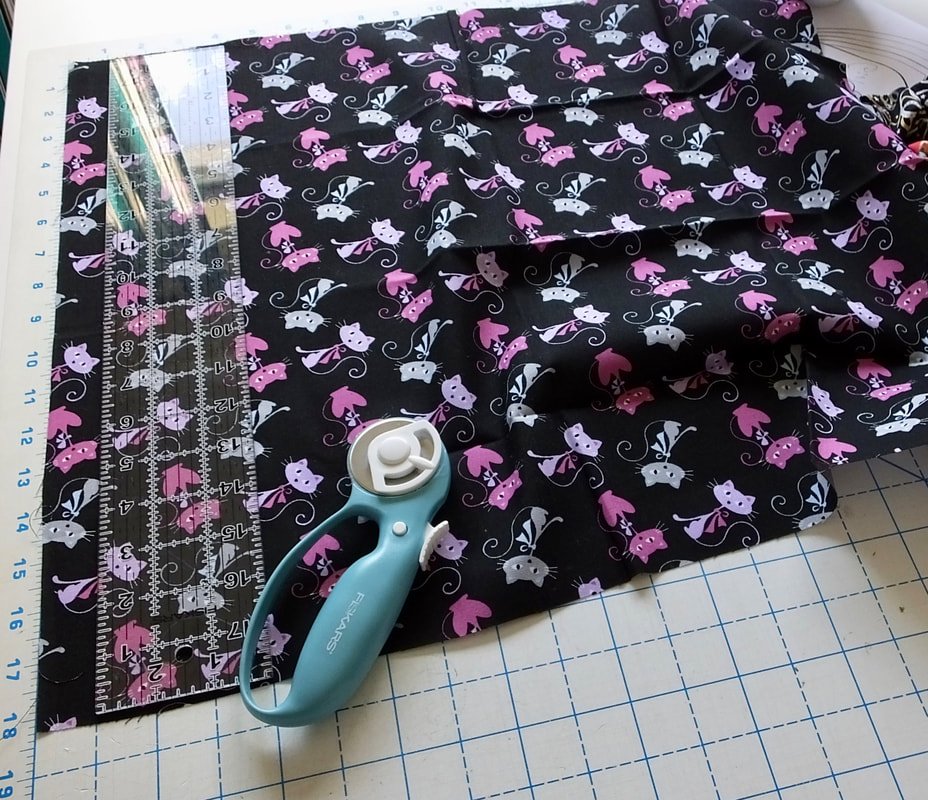
1/8 yard of fabric or a fat quarter (smaller prints work best)
Pair of magnetic clips for the watch
Sewing machine
Matching thread, bobbin, notions, etc.
Sewing machine
Rotary cutter
Ruler and cutting mat
Safety pin or other object for turning tubes
I don't have an Apple watch, but my friend does and she asked if I'd make her a few scrunchy wristbands for it. I searched all over to find a tutorial, and it was hard to find one. I honestly didn't even know the scrunchie wristband was a thing, but the 80s and 90s are back in full swing, so...
I found a tutorial and made 3, but I wasn't happy with them. I figured if she wanted more after the first set, I'd fiddle with a pattern and make them differently. Well, she asked for more and I created a whole new pattern. The end result was much prettier, fluffier, and more like an actual scrunchy. Yay! So, I wanted to share how to make these with you. If you do make one, tag me so I can see them. These make great scrap-busting projects as well. Win-Win!

Instructions
Step 1. Cut your fabric into an 18" by 4" strip. If you have a rotary cutter, ruler, and cutting mat, this makes the process easy. If not, use chalk or invisible ink and scissors to mark and cut the strip.
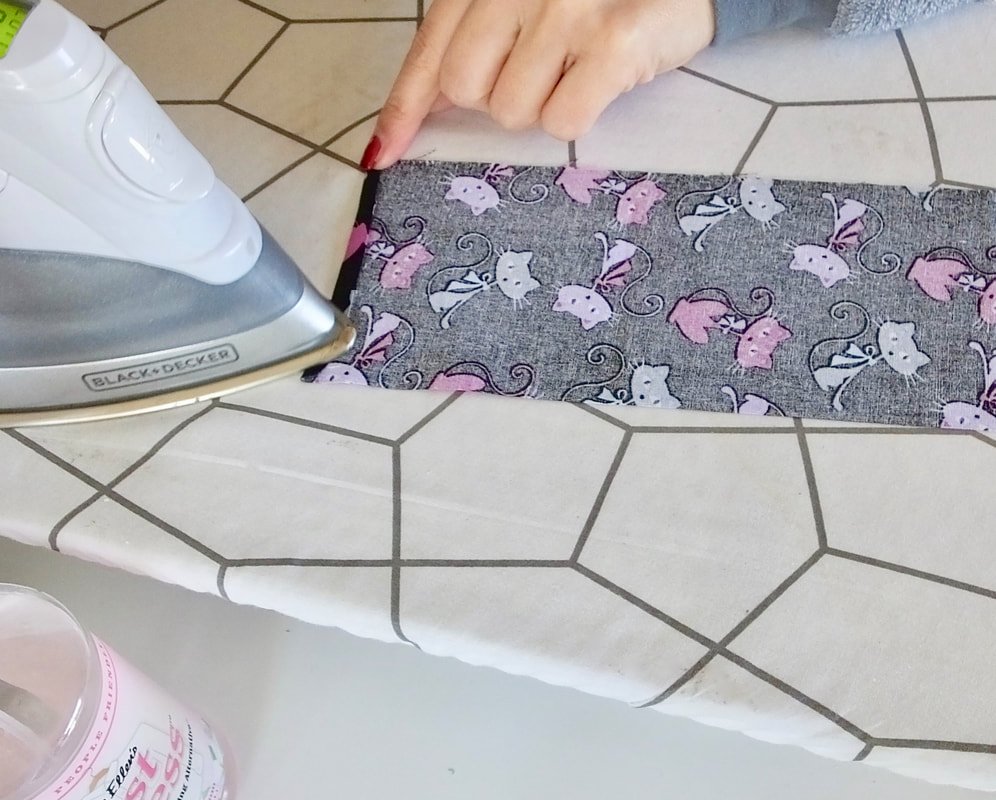


Press the strip flat, and fold down a 1/4" strip on each short end, wrong sides together. Press.
Sew a 1/4" seam down the strip. Backstitch at each end.


Grab your safety pin and attach it to one of the tube ends. Or use whatever method you like for turning tubes.
Feed the safety pin back through the tube until it comes out the other side. Gently pull it through and take off the safety pin. Go back to the iron to press the seam.
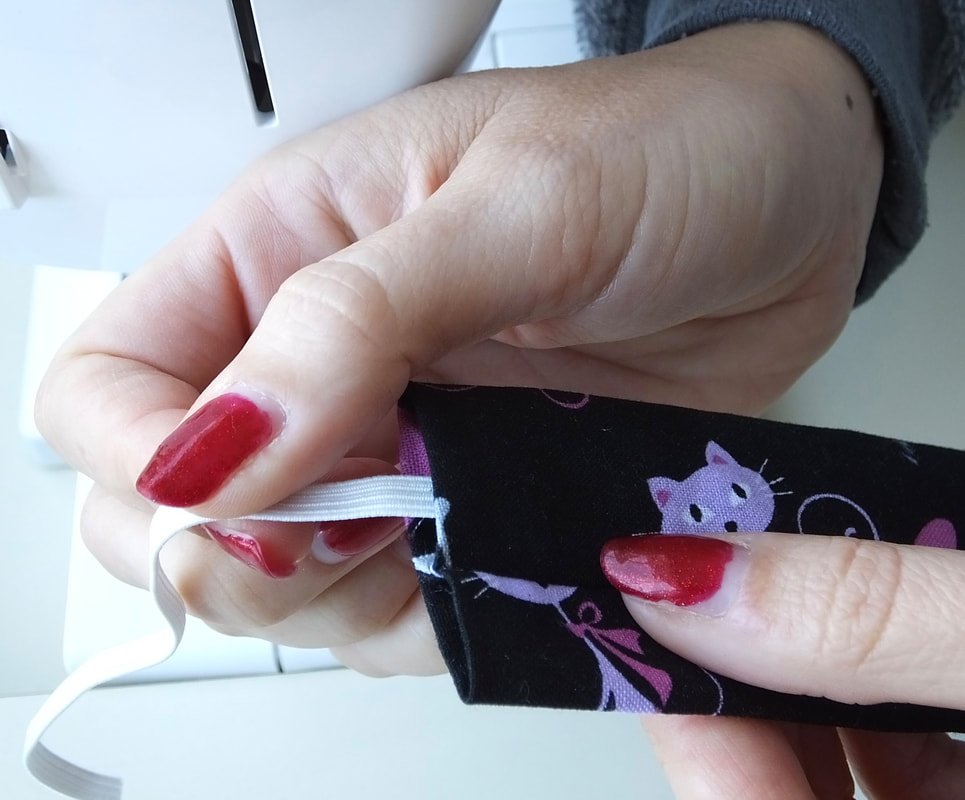
Measure your wrist and figure out how much elastic you'll need. My friend has a smaller wrist, so I cut a 6" piece. If you have a larger wrist, you will want to cut a 7-8" piece.
Stick the safety pin or a bodkin at the end and feed the elastic through the tube.
Use another safety pin or clip to hold the elastic at one end while you feed the elastic through to the other end.
Feed the elastic through the tube. I prefer to have the seam in the middle, but you can push it to one side if you like.
Sew one end with a scant 1/4" seam and go over the elastic 2 or 3 times, being sure to backstitch. Repeat on the other end.
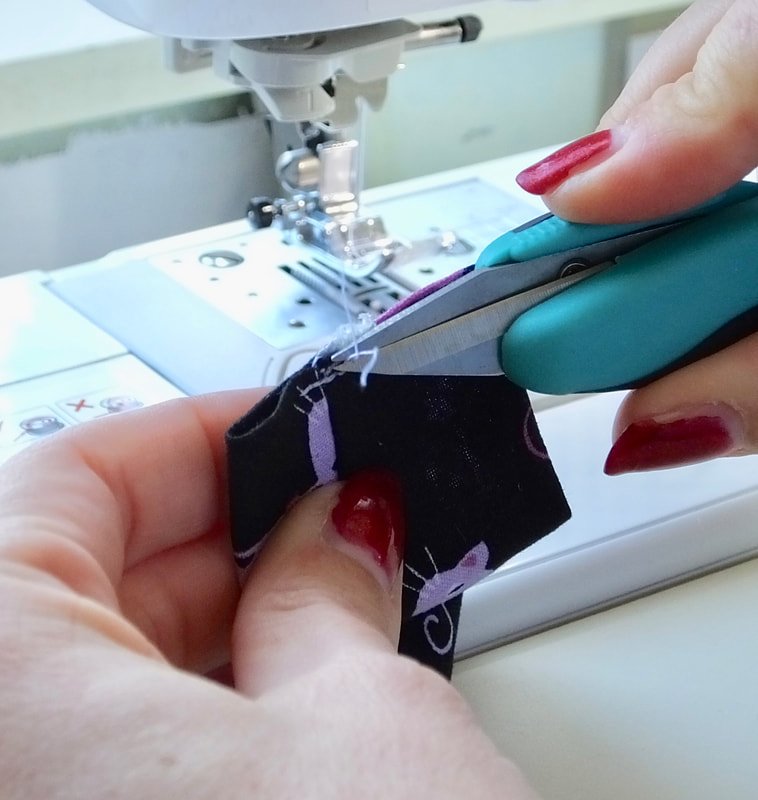
Snip those threads.
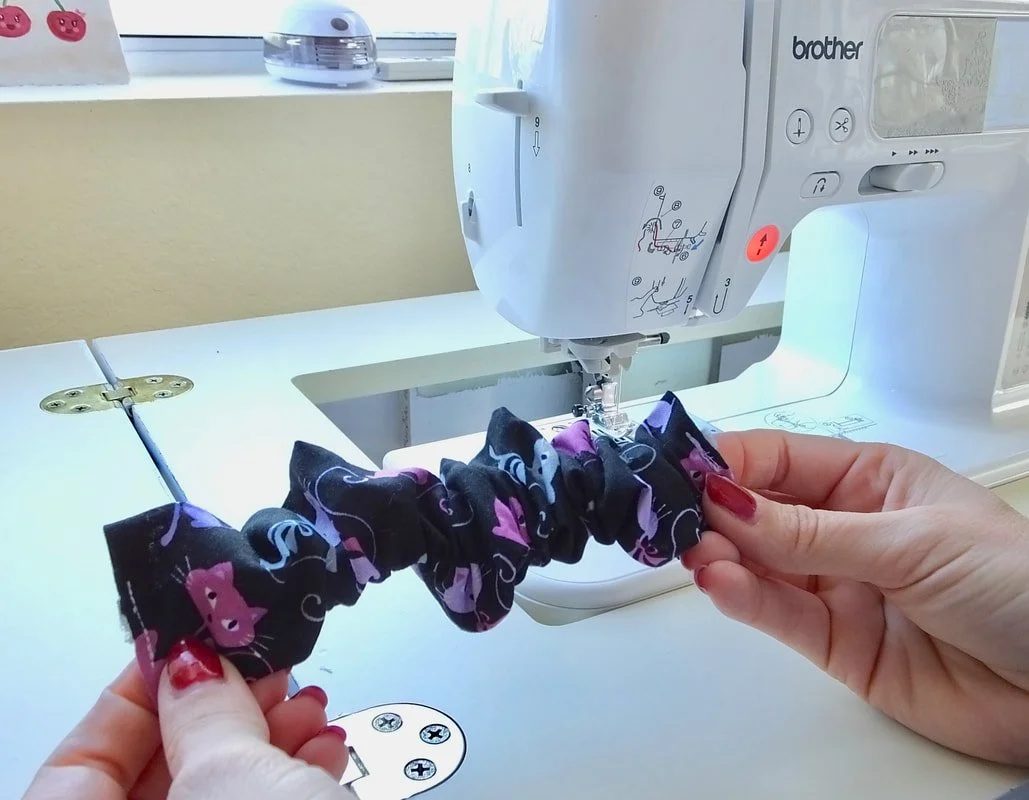
Ta-Da! You're almost done.
It should resemble something like this. If not, get that seam ripper and go back a few steps. My elastic slipped out from one end and I had to redo the elastic twice. Make sure you clip the end to keep the elastic from popping out.
Now grab those magnetic clips. The easy part is done. They come in a little box like this. I saved the boxes to reuse for something. Buttons perhaps? Or spent needles that need to go in the trash.
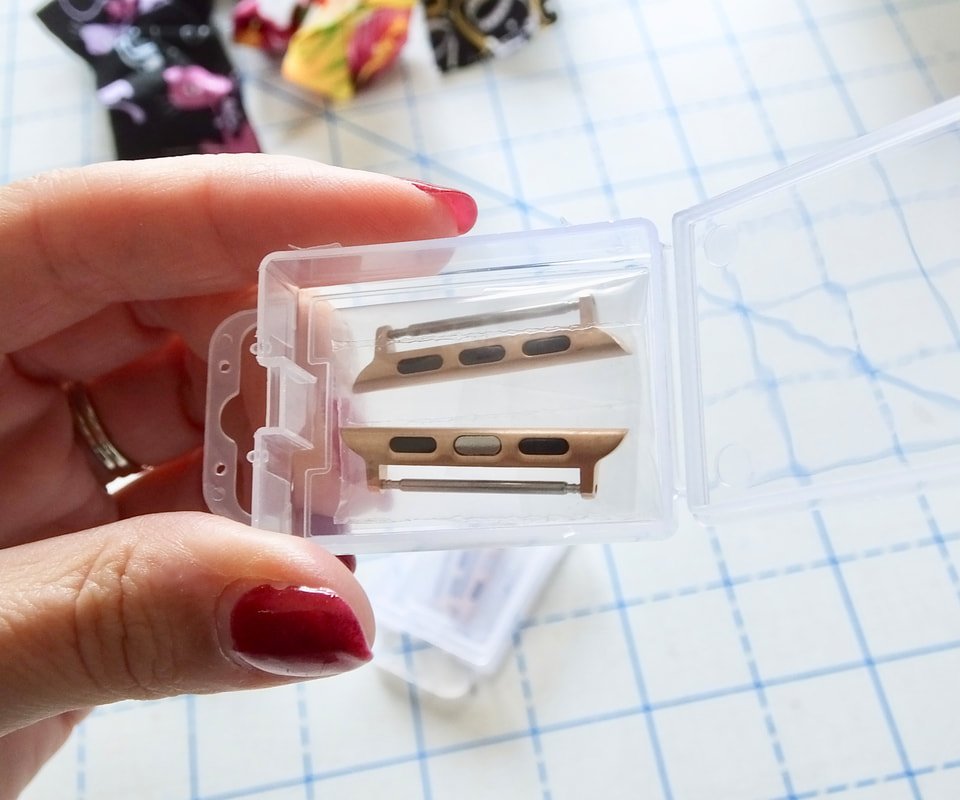
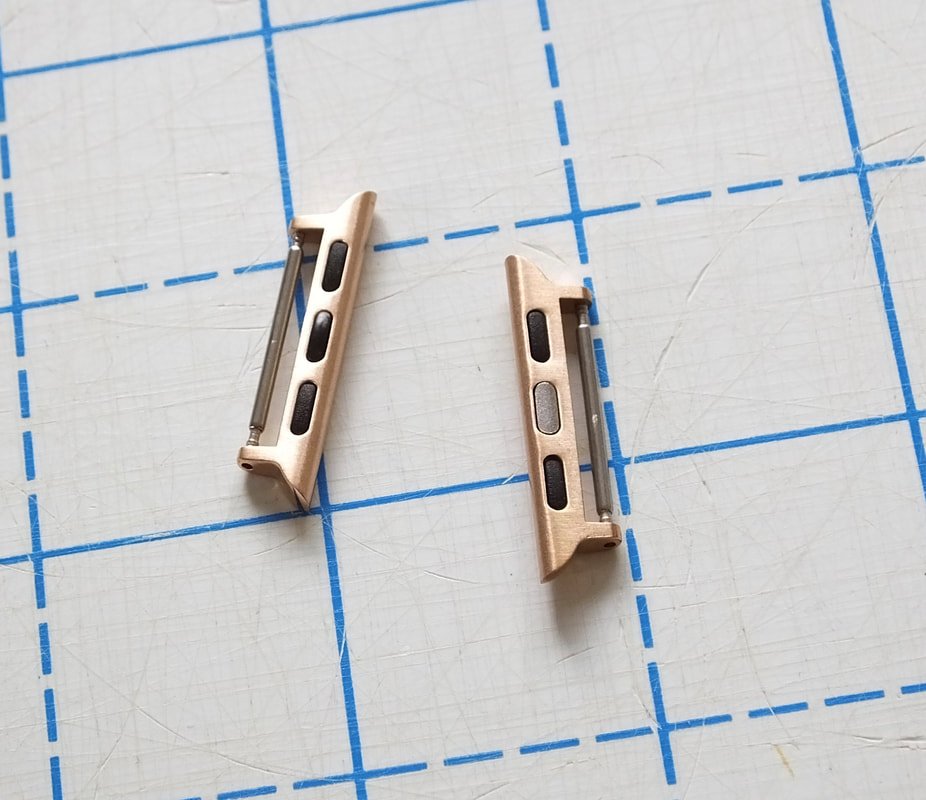
Notice the 2 different sides and magnets. We'll want to use the side with 3 black magnets.
This is honestly the least enjoyable part of making these simple scrunchies. Take a sip of tea, eat a piece of chocolate, or scream into a pillow, and let's do this!
Make sure the clip has the 3 black magnets facing upwards. Then stick a corner of the scrunchy through the back and carefully pull and tug until it's through the itty bitty gap. I pull it until it overlaps about 1/2" or so. Clip or pin this end in place. Do the same thing with the other side. This definitely takes some patience. Don't get frustrated, if you need to use the other corner to stuff inside, do that. This part takes some finagling for sure.
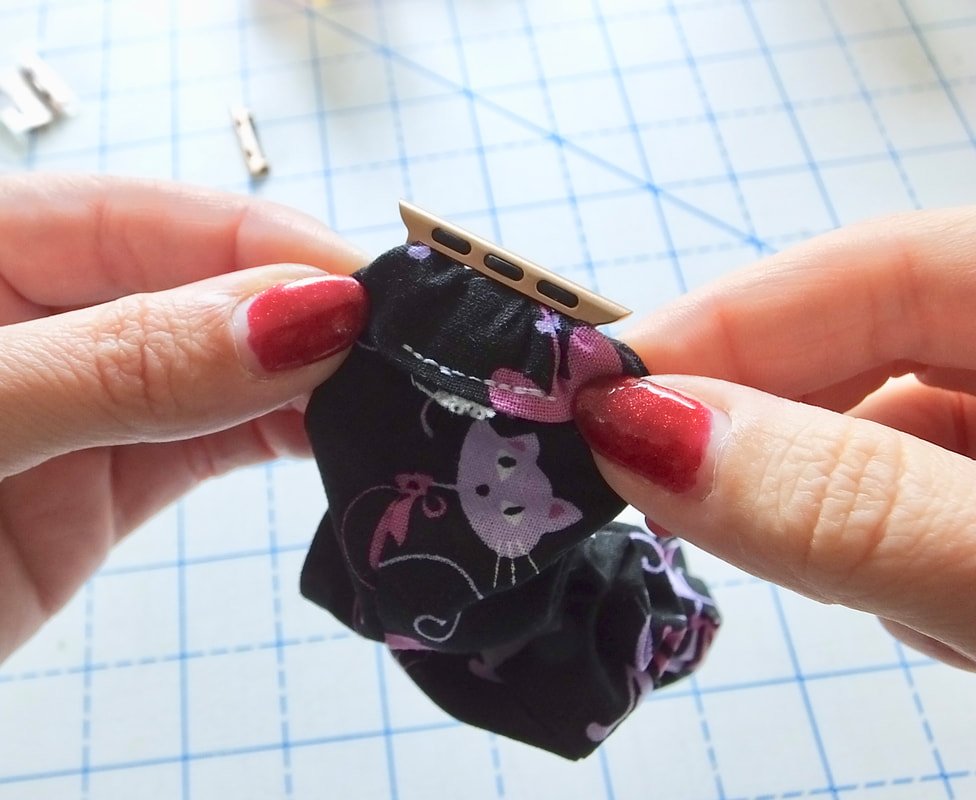
Should look like this when the fabric is pulled through. Make sure you see the black magnets.
I used wonder clips to hold the ends, but pins work too.
Sew the ends closed. Be careful not to stitch through the magnet clips. I found it helpful and easy to have the magnet to the left of the needle. It seemed easier for the machine too. I stitched right over the area that was previously stitched to keep the elastic in place. Backstitch and you're done! Insert it into your watch and go.

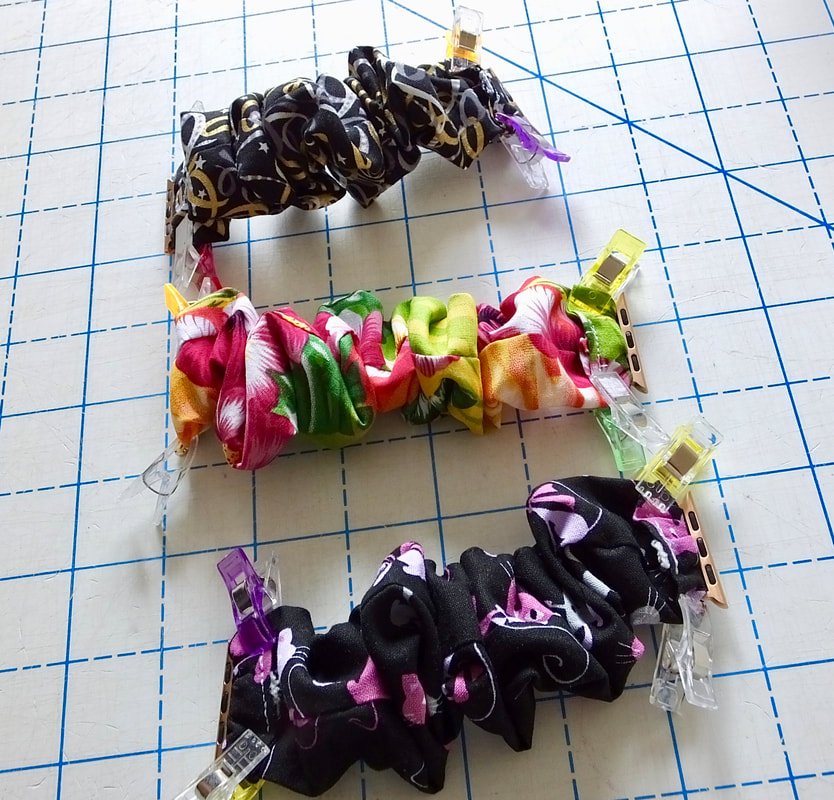
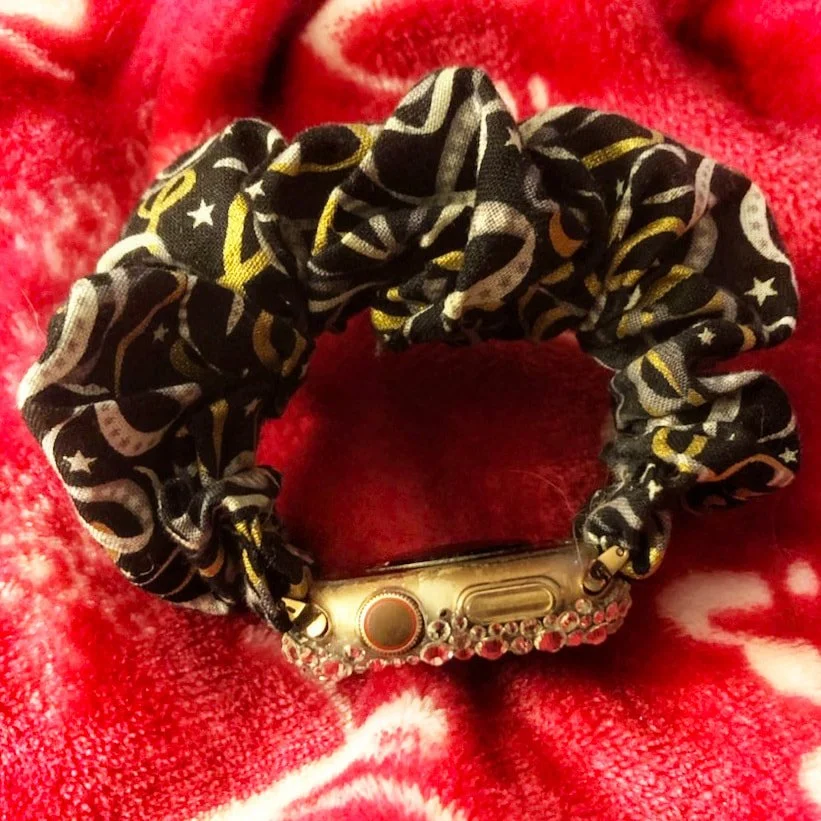
I made 3 different prints. You can do one for every holiday! They're really easy to batch sew.


Thanks for hanging out and if you make one, please tag me on Instagram. I want to see what it looks like. :)
Still wondering if it's a scrunchie or scrunchy,
Annette

Stash Buster: Gathered Skirts
If you have 2 yards of fabric that you need to use up, sew a gather skirt. They’re easy and beginner friendly too.

I have a silly question for you. Do you ever buy fabric without knowing what you'll make with it?
Quietly raises a hand, I'm guilty of this. #fabrichoarder
Well, boredom set in on a Friday night and I didn't have to taxi kids around.
So, I opted for the ole "cereal for dinner" mantra.
And I took a whole afternoon turned to night, for me. And did some selfish sewing.
I looked in my stash and had Halloween fabric I bought years...and years ago. I also had some fun with Jetson's fabric. I'm a child of the 80's after all. It was a stash-busting selfish sewing kind of night.
I always buy at least 2 yards of fabric, especially If I'm unsure what it'll get used for. You can usually get a skirt, a top, or a blanket and matching items for a baby gift, etc. out of 2 yards.
All I needed was 2 yards of fabric, an invisible zipper, and coffee.
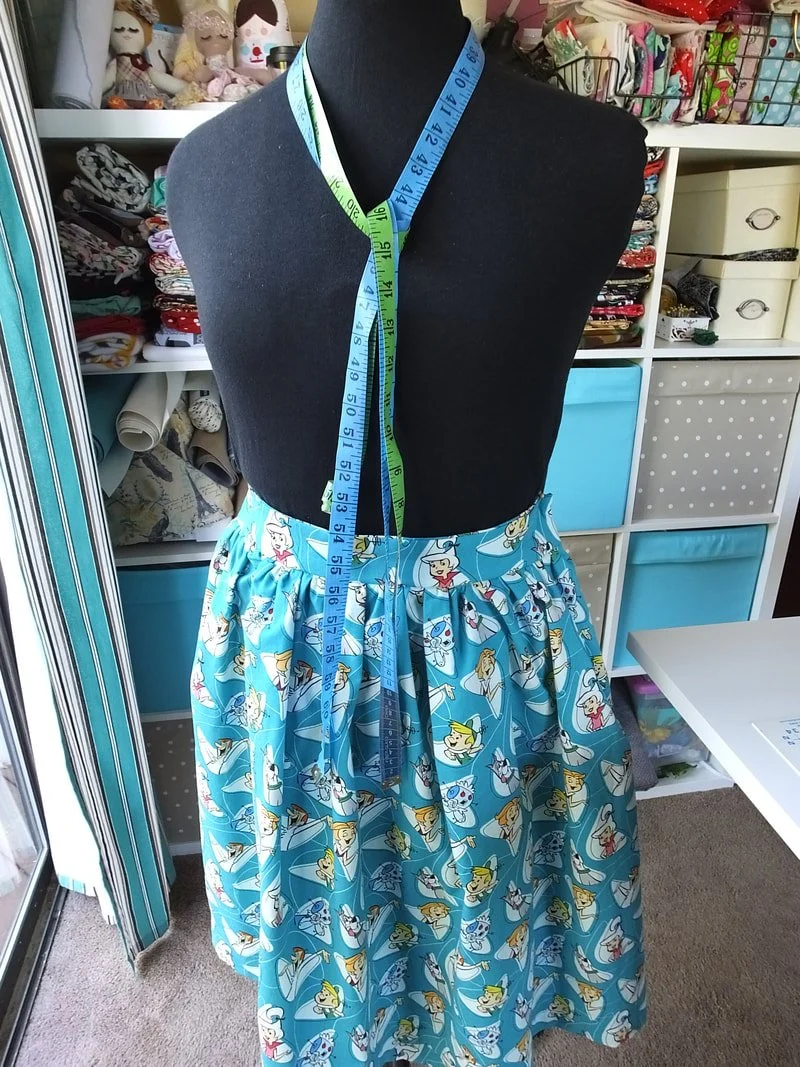
Jetsons fabric gathered skirt. This is my favorite fabric.
I decided to make three gathered skirts for my wild and crazy Friday night.

Super simple self-drafted pattern and cut them out assembly style. Then, sewed them up. I used an invisible zipper on each and opted out of adding pockets. Although, I regret that decision now. When making your own skirts, always add pockets! Pockets are life!

My pinup zombie Halloween gathered skirt
If you've never made a gathered skirt, do a quick Google search and draft a pattern. They are super easy and fun. Perfect for quilting cotton fabrics too. Yay! We all have those fun novelty prints in our stash. Just make sure you pre-wash that fabric. And... bonus, different fabrics will change the look of the skirt. Velvet and taffeta make great holiday party skirts, as where gingham will create a casual Sunday skirt.
That's it. This was a short and simple post and I hope you enjoyed it.
Now go do some selfish stash busting sewing!
Yours skirt-wearing friend,
Annette

Brother PQ1500SL Sewing Machine Review
Brother PQ1500SL review. This industrial like, home sewing machine is great for sewing garments. Read my review here.

How are you? Safe and sane, hopefully. Things are crazy around here, but we're getting used to our new "normal". Will life ever go back to the way it was? Who knows.
Let's talk about mask making for a second. Whew! What a whirlwind that is, amiright? I've never made hundreds of one item before, until I decided to sew face masks. They were needed everywhere overnight. I've donated them, sold them, made them for friends and family, etc., just like most of us in the sewing community.
Just like many of you, I got tired of sewing masks. Making the same thing over and over takes a toll on you. Mind, body, spirit, and soul.
At some point in the midst of mask making, a new sewing machine was ordered, by magical fairies who love me, presumably. I had my eyes set on this particular one for a couple of years. It wasn't an essential item, but with all the necessary sewing going on, I allowed it.
They sent me the wrong machine at first, and then finally, 2 weeks later the correct machine arrived. Wheeee!! I was so excited.
Although, hesitation and fear kept me from opening it right away. What if I didn't love it? Maybe it was too advanced for me. It is a straight stitch only machine, after all. It sat outside for 24 hours to decontaminate before opening up the box and bringing it inside. Crazy, I know.

Let me start off by saying, WOW! She's a beast! She’s heavy and the box was huuuge!
My new Brother PQ1500SL sewing machine was here and itching to be used. And, holy cow, she exceeded all my expectations and some.
The machine came with a plethora of accessories and I totally nerded out on all of these, of course!
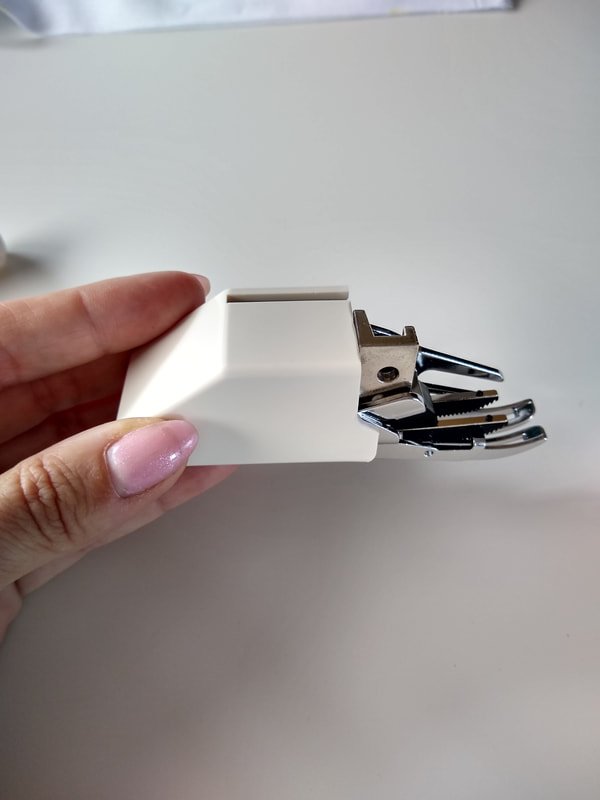
The machine has a large extension table that is dreamy. It came with multiple feet including a whopper of a walking foot.
Threading is as easy as pie. Winding the bobbin is easy as well.
It doesn't have a drop-in bobbin, which I thought would be annoying. However, it's easy to change because there are 3 doors that open up, making it convenient to change during a project.
A fun surprise that was included was a loaded bobbin. I've bought a few new machines in my almost 20 years of sewing, and they've never come with a loaded bobbin! This was exciting for me. It really is the little things.
Or I lost my marbles after making hundreds of masks, and any small thing was pure joy at this point. Who knows!
Once I received my new Brother sewing machine, I got a second mask-making wind. I was so antsy to use it. Give a kid a new toy, of course they want to play with it right away!

Sewed the first mask beautifully.
Nevermind the stack of things that I started and couldn't finish before the pandemic. I couldn't sew something for myself during a crisis, that just felt wrong to me. So, I made more masks. So many more masks. But, they were made with a big smile because I had a shiny new toy.

The machine came with a fully loaded bobbin! You wind the thread up and around to the cutter. So easy and convenient. No pulling the thread up with upper thread.
I'm a sucker for accessories! Do you love gadgets and get excited to use them? Here's everything it came with.

Feet galore
Zipper foot
invisible zipper foot
Walking foot
Rolled hem foot
1/4" foot
Pin feed foot
Free motion quilting foot
Seam guide
Feed pin and lining plate screws
Fabric Separator
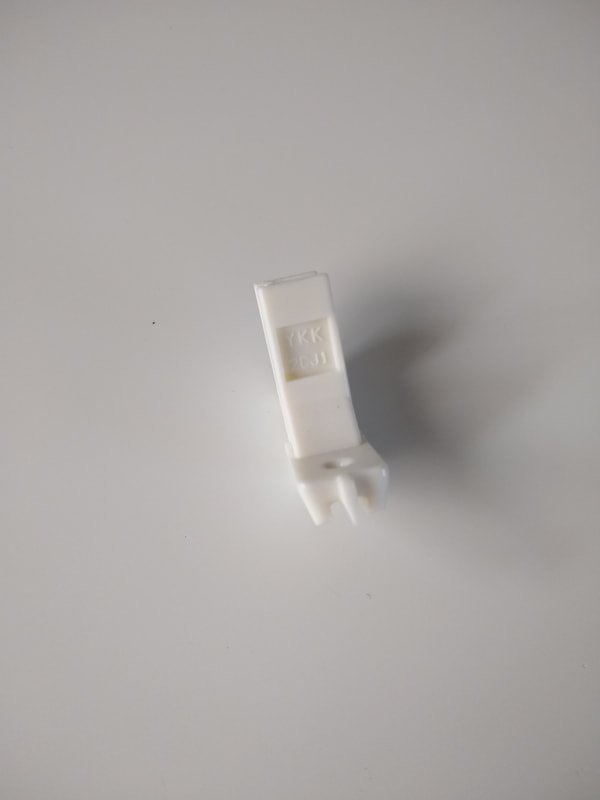
Walking foot to help with quilting and sewing many layers. A YKK invisible zipper foot.
That particular invisible zipper foot in the photo above is the greatest thing I've ever used! I sew a lot of invisible zippers into my clothes, I'm familiar with invisible zipper feet. But, my metal go-to foot has nothing on that plastic YKK beauty! It even looks different, see the pointy middle part? It's a game-changer. I didn't have to pull and yank and coax the zipper while I sewed it in. It just did its own thing and we sewed in harmonial bliss. It's a high-shank foot, so check what type of sewing machine you have before you order this puppy. But, if you use invisible zips often, get yourself one. You won't regret it. ;) I saw them on Amazon and online shops, look for a Juki invisible zipper foot.
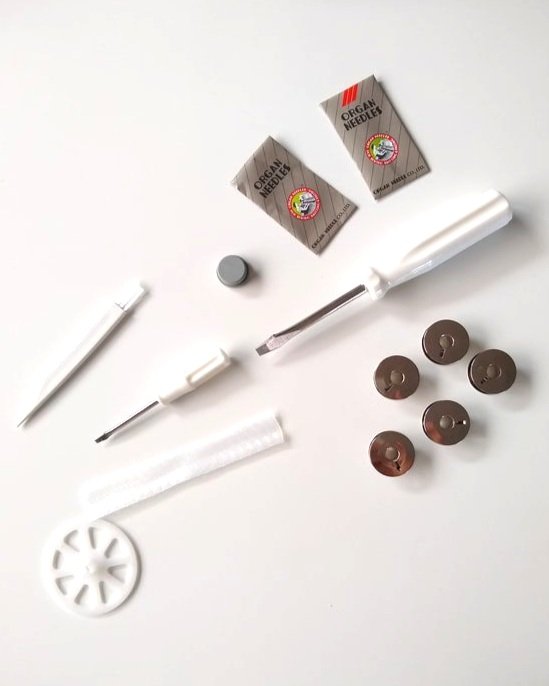
More Accessories
5 bobbins
6 extra needles
Lint cleaning brush
Small screwdriver and medium screwdriver
Spool cap and net
Feed pin changer
Extension table with measuring strip on it
Knee lift
Spool Cushion
Soft machine cover
Knee lift and fabric extension table


Sewing Machine cover. It only fits if you remove the table and knee lift.
The machine came with a cover made of vinyl and has a thin layer of foam inside the front and back. It's nice and roomy. It says "For Professional Use" on the front and that makes me feel all professional-like. No big deal. ;)
You have to remove the table for the cover to fit properly. But, I plop the cover over the machine and call it a day.

The machine without the table. I have come to absolutely love the knee lift. I don’t know how I ever sewed without it.
Onto the fun part, the actual sewing. Squeee!!
I had a minor hiccup in the beginning because the bobbin wasn't "clicked" in all the way. Once that was figured out, we were good to go. Just make sure it makes a loud click. If you get a new sewing machine or serger, it's good practice to load the bobbin and thread the machine a few times. It helps you get familiar with the motions. I loaded 2 bobbins and those went smoothly, a little louder than a plastic bobbin, but they wound quickly and evenly.
Threading the upper thread was easy. It's a tad different than my other home sewing machines because the tension discs are on the outside. The manual walks you through the process and even shows an alternative way to thread if you have tension issues. Thank you, Mister Manual Writer, or Miss. ;)
The Brother PQ1500SL does not alert you when the bobbin is running out. My other Brother machines make a warning beep when the bobbin is low. I thought this would be frustrating because let's be honest, it's nice to know when the bobbin is empty before you've sewn a whole pant leg. But... I prefer not to know! My other machine starts beeping at you and stops you from sewing, a good 2 feet of length before the bobbin is empty. I get frustrated and it's more hassle than it's worth.
Not knowing when I'll run out is much less stressful. I sew until I notice my seam is wonky. I take the bobbin out, load it, and pop it back in. Quick and painless. No annoying beep. Woohoo!!
This machine only sews straight stitches, nothing else. I will have to use another machine when I sew my bras and other things that need a zigzag. No biggy.
I cannot wait to sew a pair of pants on this machine, it's so fast and will sew a long inseam in a jiffy. 1500 stitches per minute (SPM) is life-altering! I used to count the seconds of my life go by while sewing with my much slower 400 SPM machine. LOL
The Brother PQ1500SL has a pin feed system and I honestly have not played with that part, yet. I'll update the post when I figure that all out. UPDATE: I’ve used it a few times. It’s made for sewing with velvet. I made two Gardner tops while using it. They turned out beautifully. Grab that post here.
But, it has a pin that feeds from below the feed dogs, upwards. It pokes the fabric layers and helps move them along. I assume it's similar to a walking foot, in theory. The manual says to use it with difficult fabric like velvet, leather, and suede.

I've sewn close to 100 masks and a Rita Blouse with the machine since it arrived.
I've test-sewn through a small variety of fabrics- super thin cotton, stretchy poplin, elastic, stretch knit, denim, and sheer fabrics. It didn't eat the thin cotton or sheer fabrics. It went over the mask pleats easily too, with no crunching sound like on my other machines.
Overall, I'm completely head over heels with this machine. I could kick myself for not buying it sooner. But, I had mom guilt. That guilt where you can't buy something nice for yourself because... kids.
If you're looking to elevate your sewing game, this is the machine for you! It's fast and powerful. I wouldn't necessarily recommend it as a beginner sewing machine. However, if you've been sewing for a while and need more power and more speed, this is for you! I sound like a car salesman, but I’m being serious. Give me all the sewing power and speed!
It doesn't have 400 decorative stitches like many other machines. It's a utility machine for sewing clothing and quilting. I don't quilt, so I can't recommend it for that. But reviews online say it's wonderful for quilting. UPDATE: I have made a few quilts with it and it sews through all the layers easily. It also does free-hand motion like a dream.
Disclaimer: I was not paid by Brother and I'm not sponsored - although I wish I was. Ha! ;) I bought this machine with my own money. And, oh my gosh, every penny was well spent!
Let me know in the comments if you have had your eye on this machine or already have it. Do you love it too?
Stay safe and healthy,
Annette