
Pattern Reviews, Sewing Hacks, Tips & Free Patterns
The Sewing Blog

The popover Dress
The Popover dress by Gertie is the easiest dress to sew. It is a fabric hog but is comfortable and flatters the figure. The pattern is from her book, Gertie Sews Jiffy Dresses.

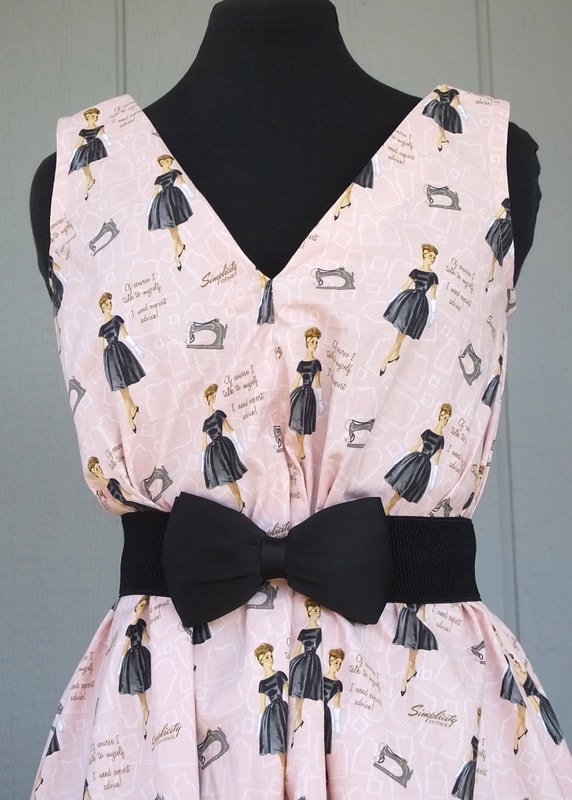
Yay!! I finally made Gretchen Hirsch's Popover dress from her book, Gertie Sews Jiffy Dresses.
Let me first start by telling you NOT to use a one-directional fabric. Holy moly, I learned that lesson the hard way. The book says you'll need 3 1/3 yards of fabric. I bought 3 1/2 yards to have extra to make a matching hair bow, purse, accent on a bag, etc. As I cut into the fabric I thought, oh shoot, I'm going to need much more! A big face-palm moment there. Ugh!
I ran back to the store and bought another 1 1/2 yards- totaling 5 yards of fabric. OMG!! Thank the fabric gods I had a 50% off coupon to use for both shopping trips. Lesson learned! Next time and there will be a next time, I will buy a multi-directional, busy print fabric. Jebus! (If you get my Simpson's reference, I love you).
Aside from my fabric choice mistake, the dress pattern was crazy easy to transfer. It basically has 1 piece. I always use freezer paper when I trace patterns. It's a good-sized roll and you get a lot of bang for your buck.
The pattern has the main dress, an armhole facing, a shoulder bow, and ginormous pocket pieces to trace. Easy peasy! I opted out of using the pockets and shoulder bows for this particular dress, but I transferred the pattern pieces for future use.
After you wash, dry, and iron your fabric, you'll cut it out. I usually like to trace the pattern while the fabric washes one day and sew it the next day. But, this dress was so simple and quick, that you could trace and sew it in an afternoon. It took me around 2 hours to sew- including making tea and a snack for myself and the kids. #momlife
I didn't let the dress hang for 24 hours before sewing up the hem- I know, I’m ashamed. But, it was going so smoothly that I wanted to just get it done so I could try on the essential tent. And boy, is it a tent. Ha!
I stuck an elastic waist belt on and WOW! Transformation doesn't even describe it. When I put on my crinoline, it was a Wowsa moment! I was a 50's housewife goddess. Exactly what Gertie promised. Yep, I love the dress!!


My only gripe is the facings don't lay flat. It could be that I didn't cut it 100% perfectly or sew it exactly in the fold area. I'll play with that on the next dress.
And also, the front is a tad low. I've seen other bloggers complain about the low neckline as well. Luckily, I preach the motto "If you got it, flaunt it." But, I can imagine the low neckline being bothersome for some.
I didn't make a step-by-step tutorial on this post because Gertie does a fabulous job on her YouTube channel. Go give that a watch if you are a visual person. I went back and referred to it a couple of times.

Serge those raw seams before you stitch everything together.

Use fusible interfacing along the facings to help stabilize them.

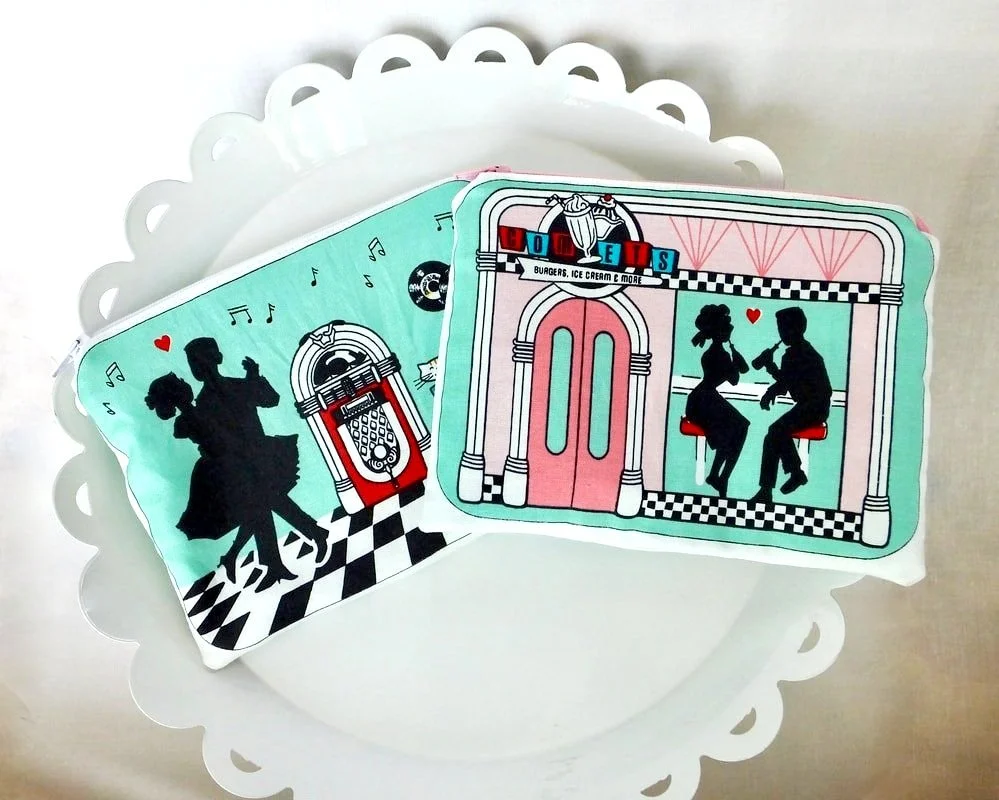
Isn't this fabric cute? It's from Joann. I love their new Simplicity line of quilting cotton and wanted to make a dress with this pink one
I am planning on making a few of these dresses for the summer. Hawaiian print, polka dots, and gingham fabric. Gimme all the carefree, fun, and flowy fabrics. I did buy 2 belts from Amazon- one black and one white. I figured they'd go with most everything because you do need an elastic cinch belt with this dress. She has an option in the book to make a shirred waist and I plan on trying that eventually.
Disclaimer: Many, many years ago I tried shirring a shirt and it was a huge disaster. Hoping to get the courage to try it again with the Popover dress.
I can see myself sewing up a few of these batch-style in a day. So easy, so comfy, and pretty darn cute too! Thanks for another great pattern, Gertie! You are amazing
So, what do you think? Are you game for making the super simple Popover dress? What other dresses do you plan on making in her book? Let me know in the comments below.
Happy Sewing,
Annette


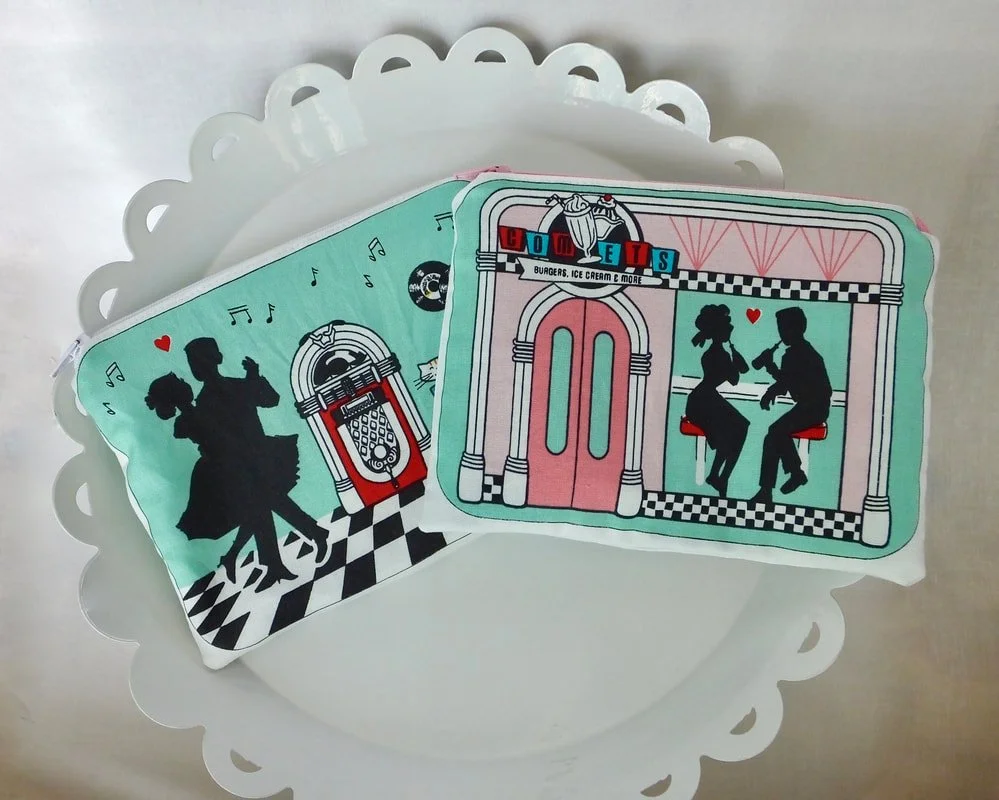
How to Make an easy Zipper Bag
Sew a quick and easy makeup bag. Zipper pouches are great and can hold everything.
Is your makeup bag worn out or do you need a quick gift to make? You can make a new zip pouch quickly. No tears, I promise. ;)
You probably have some cute fabric already in your stash. You don't need a lot, just a few large scraps.

Materials:
2 pieces of outer fabric measuring 7" wide by 9" long
2 pieces of inner fabric measuring 7" wide by 9" long
Fusible fleece interfacing for stability
12-14" Zipper ( I prefer a longer zipper, it makes it easier)
Sewing machine
Matching thread and bobbin
Zipper foot
Chopstick or sad unsharpened pencil for poking out corners
Labels if you want to add a personal touch
Iron and board
Seam ripper... just in case
Begin by cutting the fabrics to your desired size. I gave the dimensions above for my bag, but you can make yours taller or wider if you want. That's the best part of sewing, you get to make it unique.
Cut the fusible fleece a tad smaller than the size of your lining. You can apply the interfacing to the wrong side of your lining or outer fabric. I chose to apply it to the lining of this bag. Follow the instructions paper on how to fuse it to your fabric.

Once the interfacing has been added, we'll attach the zipper.
Don't be scared, zippers are really easy and if you mess up... you have that trusty seam ripper.
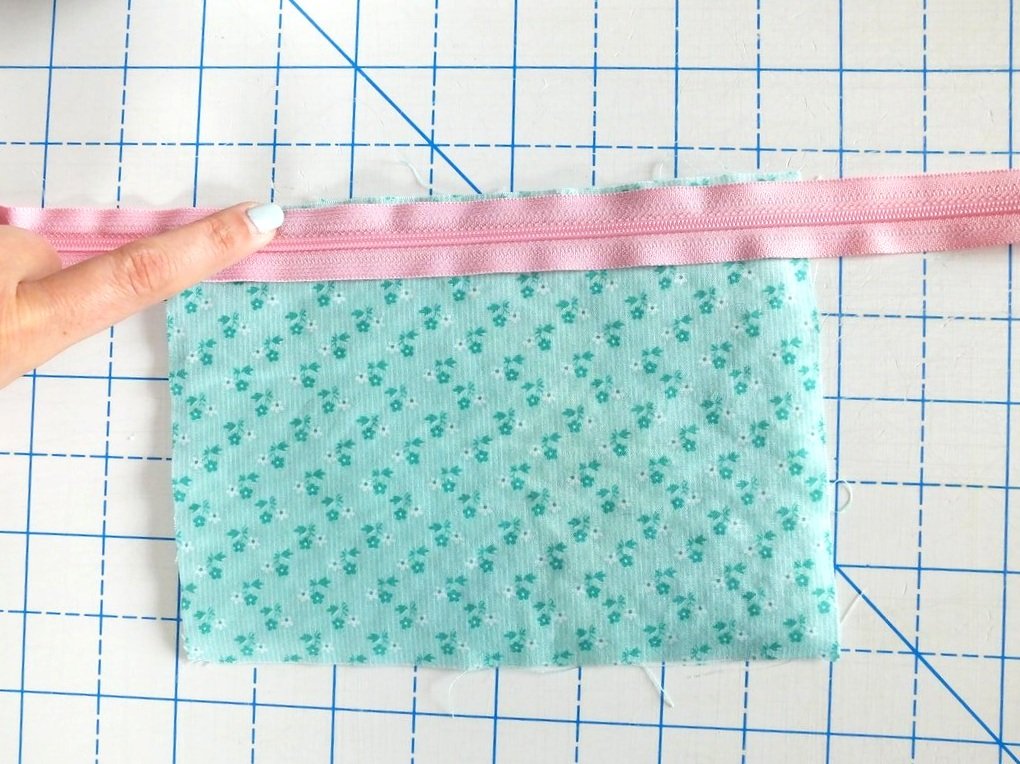
Lay the lining right side up. Place the zipper with the teeth facing up. Zipper pull on the left.


Adjust your needle position to the middle. This is important, you don't want to break a needle. Ask me how I know this. Sigh…
I use clips to keep the 3 layers secure. But, I adjust the layers manually while I'm sewing the zipper in.
Sandwich your fabric and zipper together. Sew.
I start sewing forward a couple of stitches, then backstitch and go forward again. Take it slowly. Your foot will keep the needle away from the zipper teeth, but go slowly, just to be safe. I readjust my layers as I go if needed. Sew until the end and backstitch a few stitches.

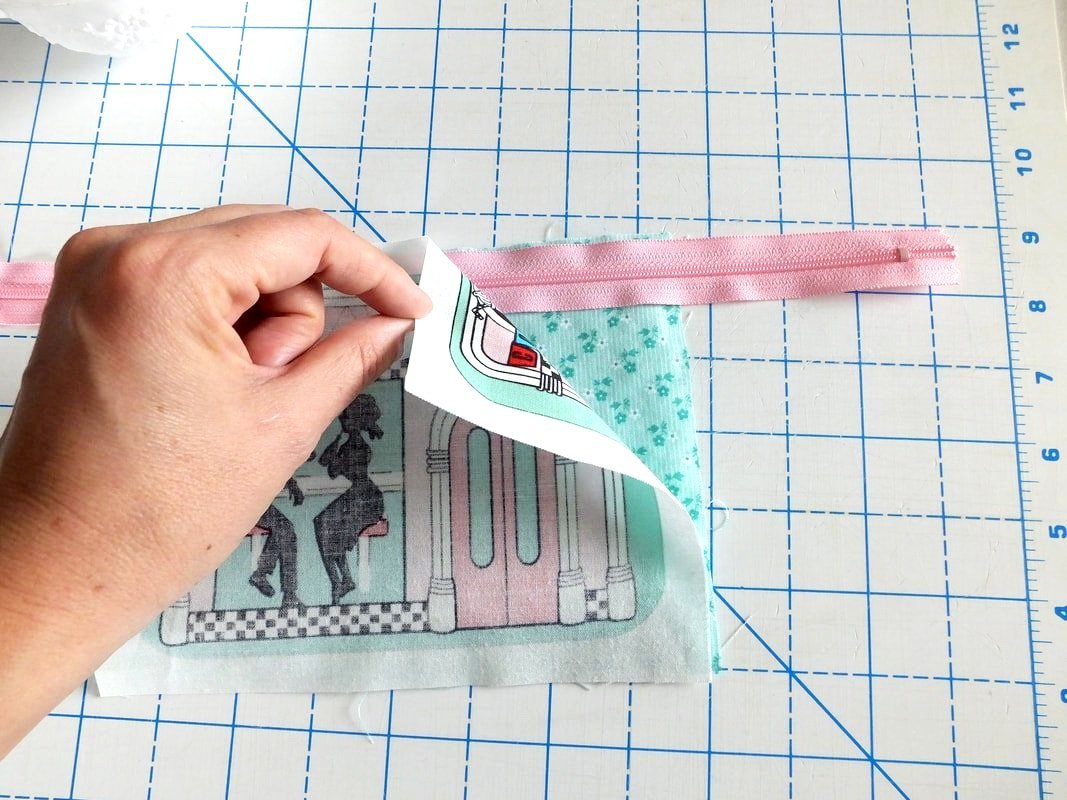
When you're done. Get your other 2 pieces of fabric and we'll sew those onto the other side of the zipper tape.

Sandwich the first half between the next outer and inner piece. Right sides together. Clip, then sew.


Press, avoiding the zipper teeth. Then topstitch.
Lay your lining face up and match it with the lining piece that has been sewn to the zipper tape, right sides together.
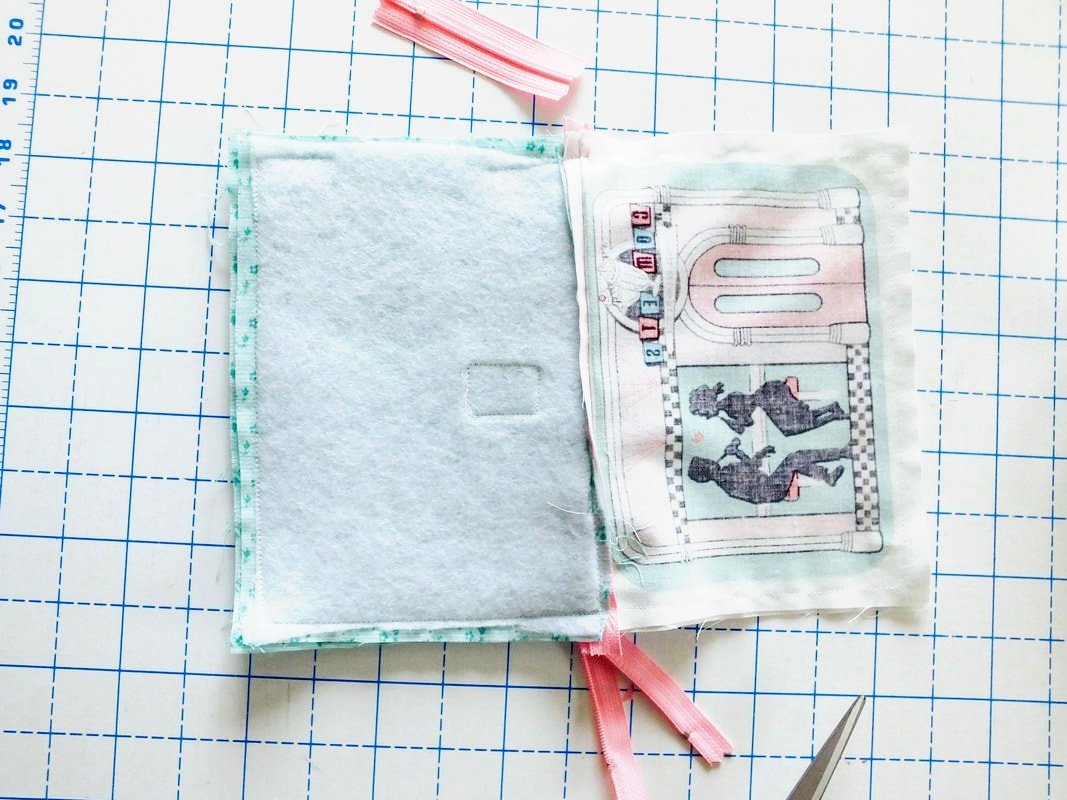
Take your outer fabric and lay it face down matching with the outer piece that has been sewn to the zipper. Both fabrics should be aligned at the top of the zipper. You'll have one massive sandwich. Don't taste it though, yuck! Take the sandwich to the machine and sew the zipper side just like you did with the first half. Backstitching at both ends. Flip the fabric pieces over so you see the zipper teeth, it should look like mine above.
Now you're going to top stitch the zipper. This keeps the fabric out of the way of the zipper teeth and gives it a nice finish. I keep my zipper foot on for this part. Adjust your stitch length to a 3.0 or 3.5mm. Top stitching is a decorative stitch, so try your best to make it straight. Go slow if you need to. After you're done, give yourself a high five! You just rocked that zipper. Wooo!

Open your zipper up, but not all the way. Keep the zipper inside the bag area, 1 inch away from the seam edge. You don't want to sew over the zipper pull. That would stink. And hurt. Broken needles are sad.
Change your foot back to your usual presser foot. You won't need the zipper foot anymore. Here we go.
This is an optional step. If you have some labels that are handmade or store-bought, attach one now. It will give your bag a polished look. Add your label at this point because it's easier and you don't really have to think about the exact position. Just eyeball it.

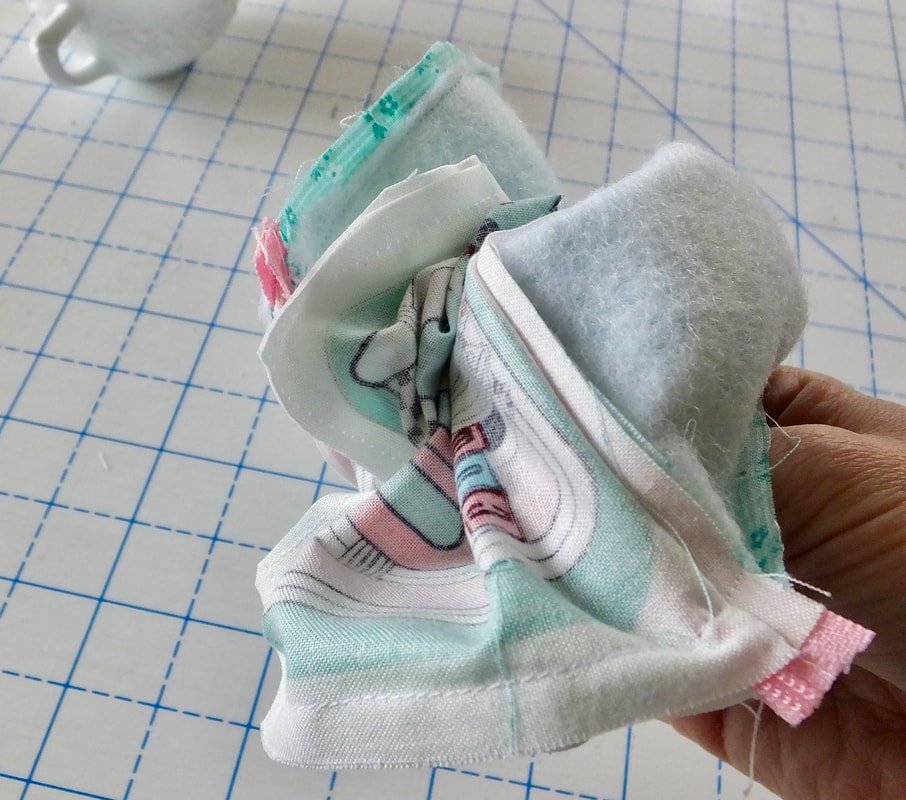
Now flip your pieces so they face each other, right sides together.

Be sure to move your zipper pull to the middle.
Pin the pieces together all around the bag. Leave a 2.5” gap in the side of the lining to turn the bag out. When you use the inside side seam, you don't see the seam afterward. It is tricky because it's close to the zipper, but the look of the inside is clean.
Start sewing at one side of the opening making sure to backstitch. You'll sew in a clockwise direction until you get to the other side of the opening. Go slowly over the zipper when you reach it, use your hand wheel if needed.
Pull your pins out before the needle hits them. When you come to the corner, leave the needle in the fabric. Lift the presser foot and pivot the bag. Drop the presser foot and continue sewing.


Go slowly over the zipper.
When you reach the other end of the opening, backstitch and cut your threads. Time to turn out the bag.

Using a pair of utility scissors, trim your zipper tape ends. Toss the excess in the trash. Trim the corners of the bag too.

Now it's time to turn the bag out. Find the opening, reach inside if you can, and pull the fabric out, slowly but firmly. Is that an oxymoron? Hmm..

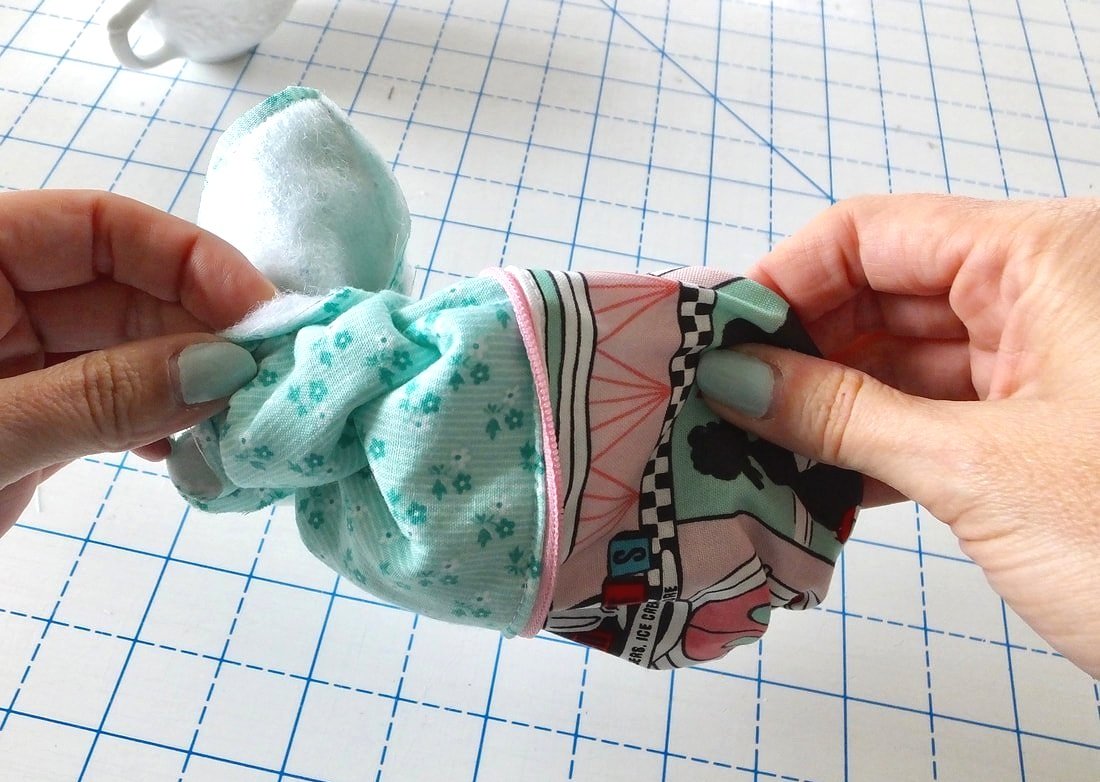
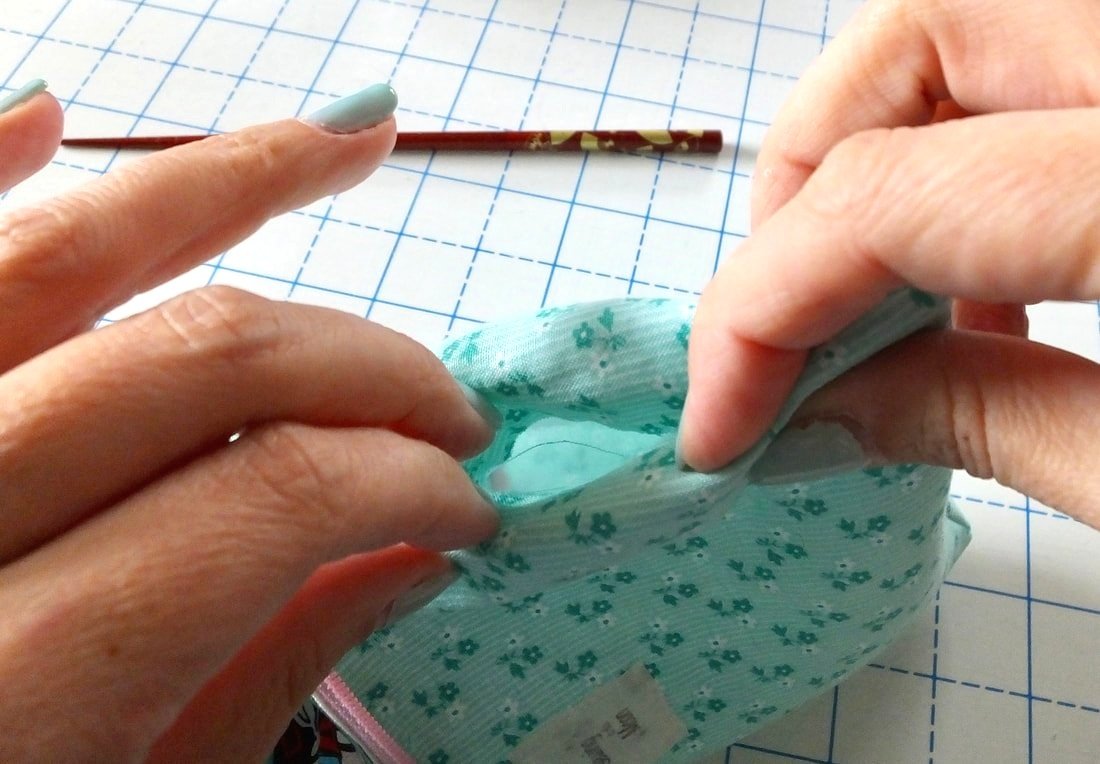
This part can get tricky, just take your time. Don't pull roughly, you might pop a seam. That's not fun, I've been told. Haha
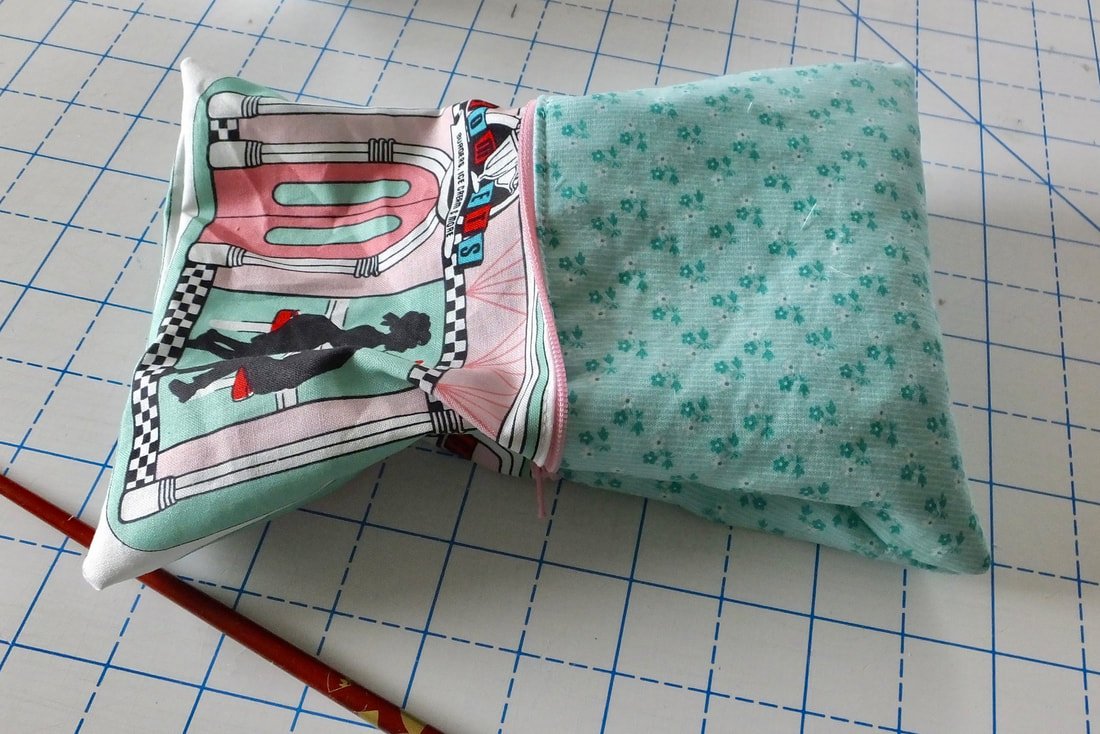
Grab your chopstick to push out the corners and make them look sharp. Be careful not to poke through the corner.
You're almost done, Yay!
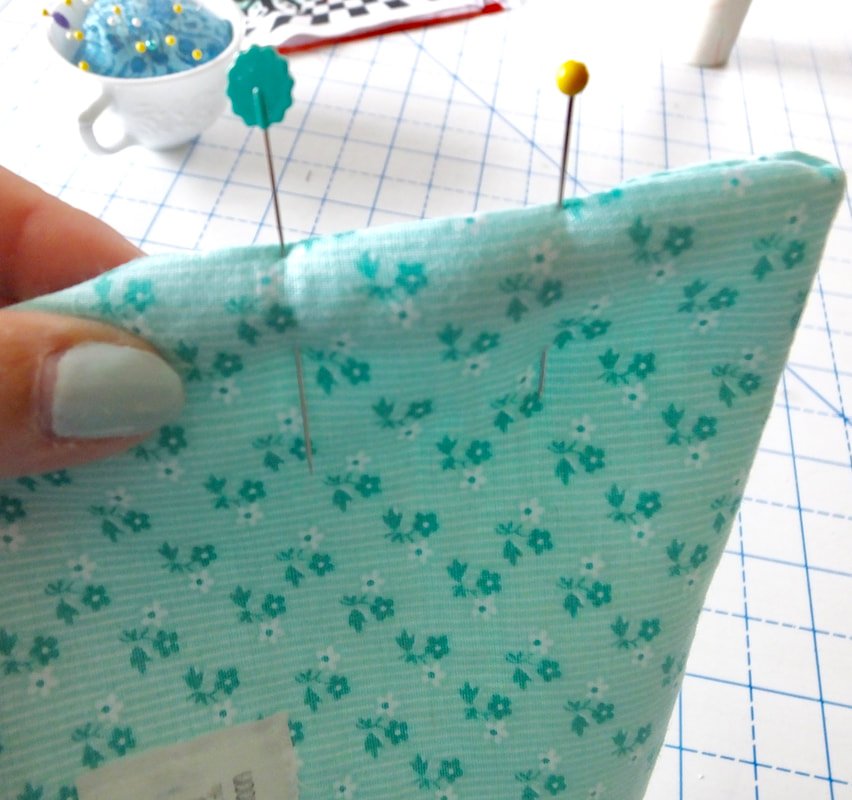
Find the opening in the side seam and tuck in the fabric within the seam allowance. Press the opening closed and add 2 pins or clips to keep the layers together. Sew the opening shut, making sure to backstitch at the beginning and end.

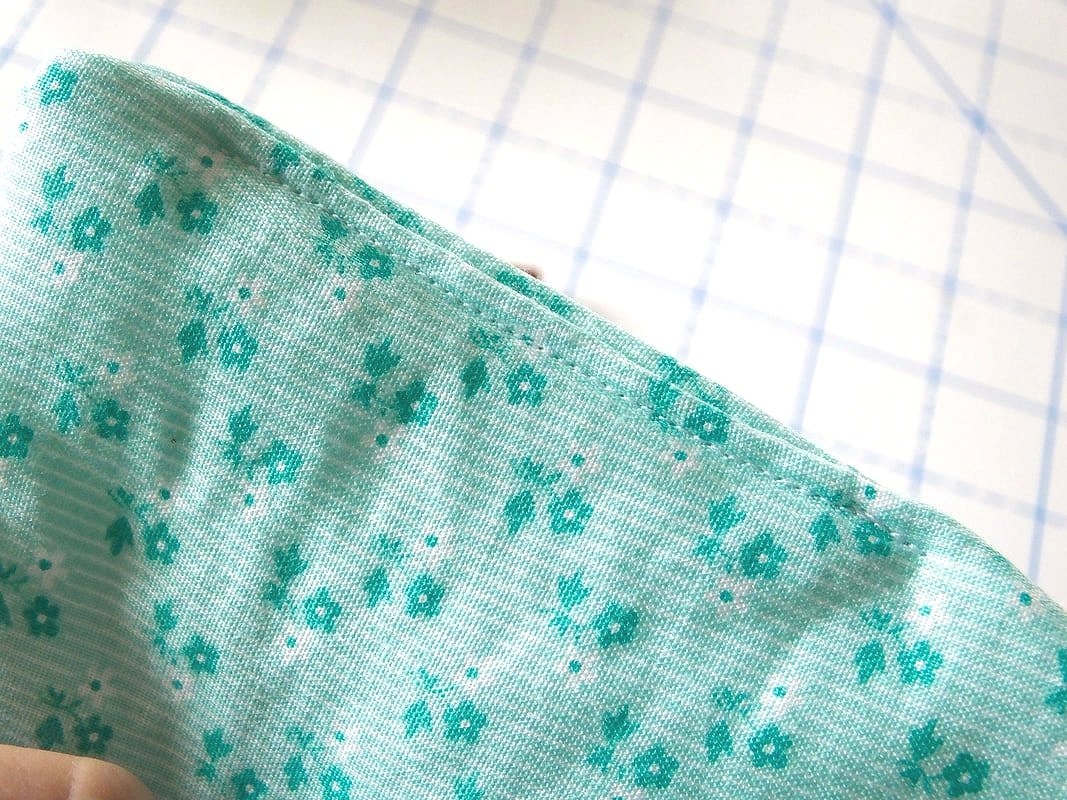
Push your lining inside the bag. Poke out corners. Press flat with the iron.
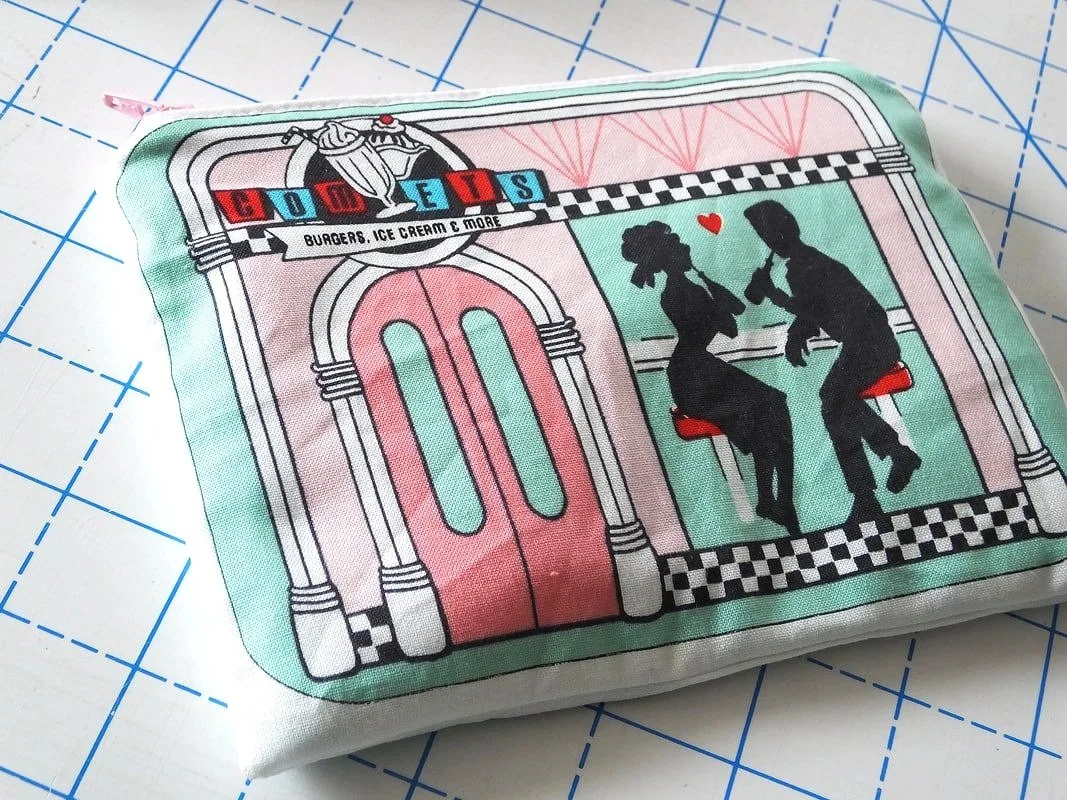
Your bag is ready for eyeliner, lipstick, a cute mirror, and tissues. Make one for your friend, child's teacher, sister, everyone, and anyone. Bags make great gifts.
What a cute bag!! Tag me on Instagram so I can see the bags you've made. @sewingtothemoon
Thanks for reading along and hanging out with me. Let me know in the comments below who you're making the bag for. Yourself or a friend?
Happy Sewing,
Annette

Me Made May 2019
Me Made May, the quarantine edition.
Me Made May. Huh? Me made what??
So...what's this Me-Made-May thing about anyway? Have you heard of it? Maybe you are reading this with a "deer in the headlights" look.
It's a maker challenge created by Zoe at So, Zo... what do you know?
“Thanks. I made it”
The challenge starts on May 1st and runs the entire month of May. It is supposed to make you aware of your handmade wardrobe-jewelry, sewing, knitting, re-fashioned pieces, anything you make, that can be worn. Sounds fun right?
Read here for Zoe's explanation: Me Made May
The challenge helps you in knowing where your handmade wardrobe is at. If you need to add more pieces. If you need to make things you actually wear. Do you need to make more tops because you only sew up pants? Or, do you sew all the fancy dresses but don't have anything you can throw on to wear grocery shopping? I’m curious what the month will. have in store for me.

I signed up and made my pledge. I pledged to wear at least one thing that is handmade each day. I also want to fix a skirt waistband and finish a dress I started last year. Ha!
She has you make a pledge over on her blog. I feel compelled to stick with it because I've made a pledge. Go make your pledge if you're interested. Zoe says you can promise whatever you want. You do not need to have a stockpile of handmade pieces. You can wear one thing once during the month of May. No stress.
I heard about the #MMM last year through a fabulous sewing podcast that I listen to while I sew. I listen while I do dishes or laundry too. Sometimes music just doesn't cut it. I love listening to these gals. They get me laughing and excited about all things sewing. Win-win in my book!
Unfortunately, I heard about the challenge last year after the month of May, figures, right? So, this year I'm going all out, not really, but I'm super excited.
Like I said above, I plan on wearing one thing I've sewn up every day in the month of May. I also plan on ripping out a waistband and redoing it on a skirt I've never worn. And... if the stars align I want to finish sewing a cheongsam dress. I will have a blog post about the dress.
It's one of the reasons I started a blog- I couldn't find this dress anywhere online. Sigh...
I can't wait to see what everyone wears and comes up with for their outfits. Also, I'm antsy to find and perhaps meet other sewists in the community! If you want to participate, sign up, and let's do this together!
I can't wait to find out what I actually wear every day. I might make a list so I can keep up with myself. Ex: May 1st...red shirt with a handmade cherry skirt. May 2nd... handmade hair scarf with shorts and white T, etc...
What do you think? Are you going to sign up? Share in the comments if you are and your IG handle so I can keep up with you. This is going to be so fun!!
Make sure to follow me on Instagram so we can be sewing besties!
Follow #memademay too, I know I am.
Happy Me Making,
Annette