
Pattern Reviews, Sewing Hacks, Tips & Free Patterns
The Sewing Blog

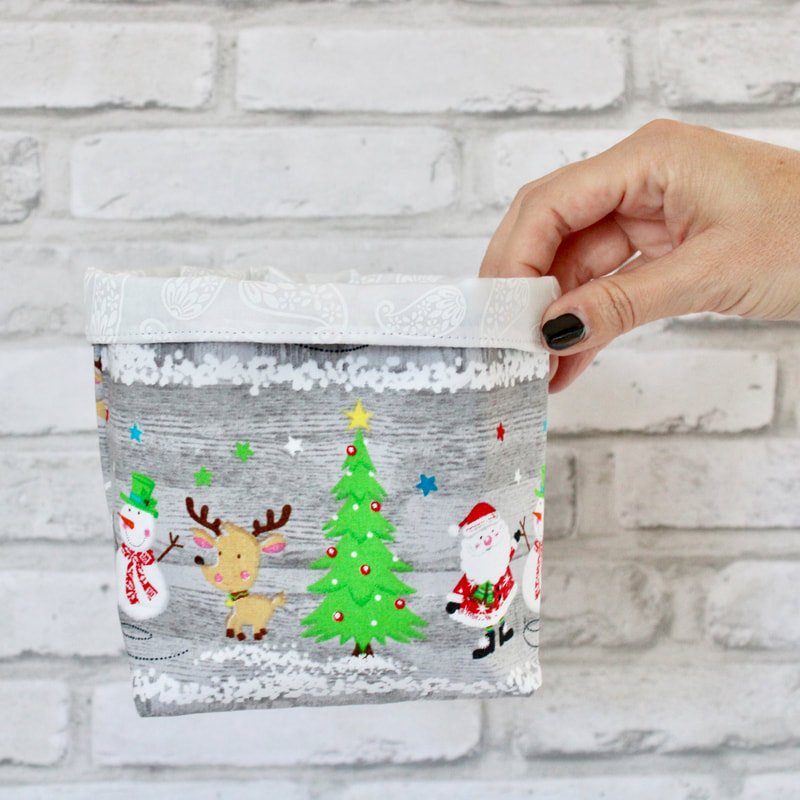
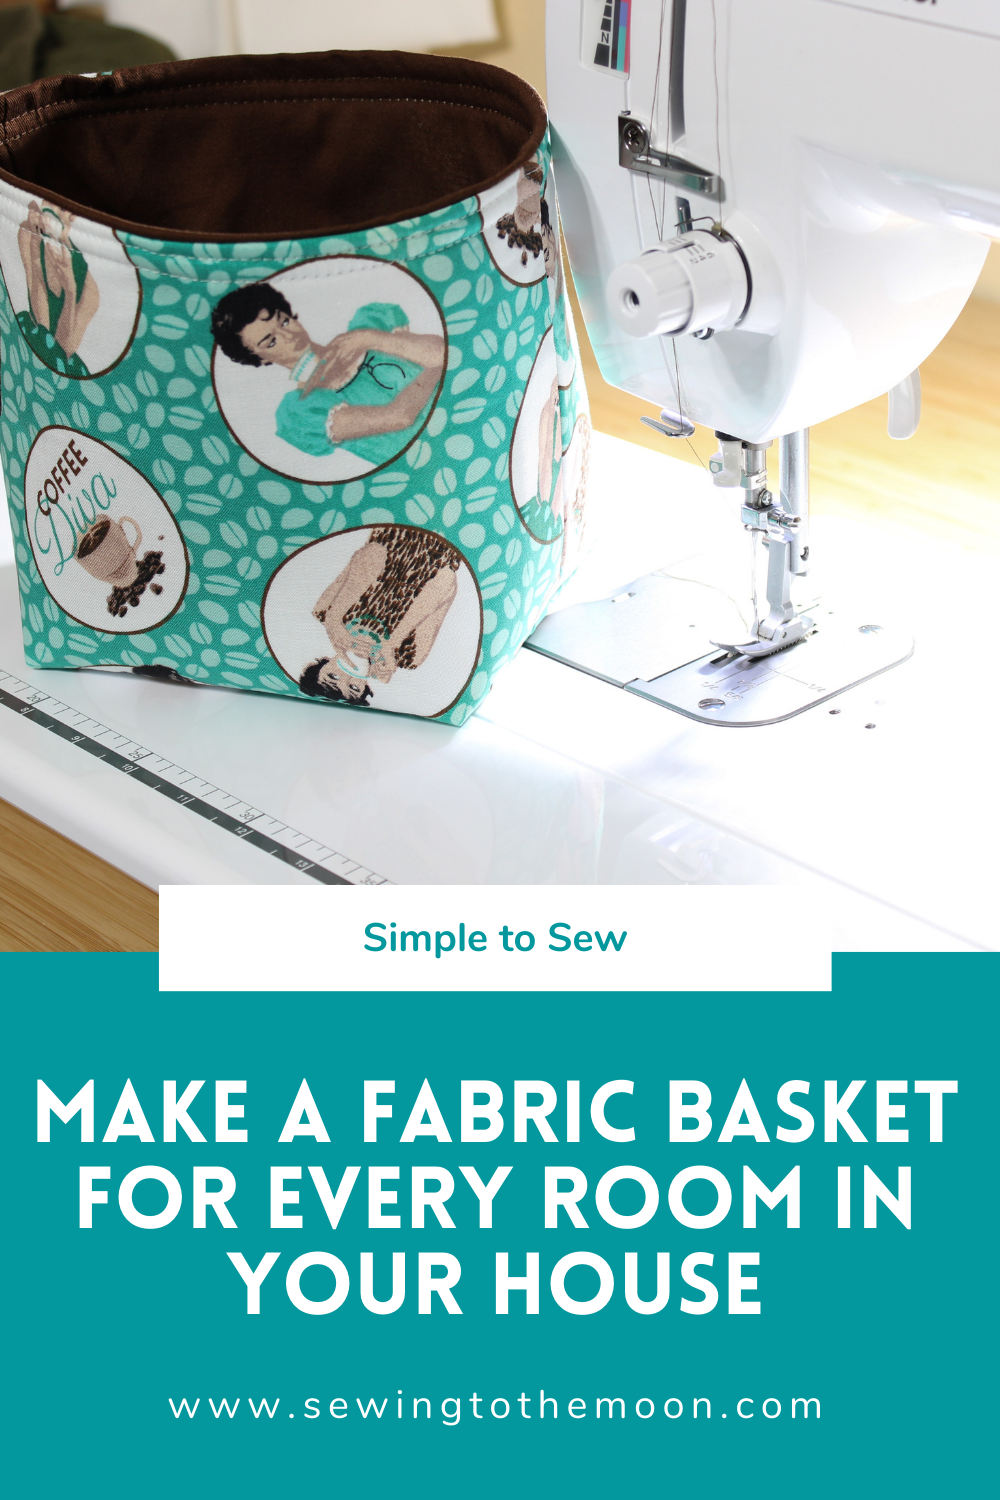
Simple to Sew: Fabric Basket
Fabric basket sewing tutorial. Sew a little bin to keep your items inside. Great for every room in the house. Free pattern and sewing tutorial.
Sew a fabric basket to store your little and bigger items. They're great for snacks in the pantry or corralling makeup items on the bathroom counter. Let's get organized!
Have you caught the organization bug lately? You've cleaned your house and now need homes for all the random little things? With the world starting to open back up, you are probably having visions of people coming over. I bet you're thinking about all the backyard parties as well. Or not. Either way, everyone could use some easy storage ideas for their home.
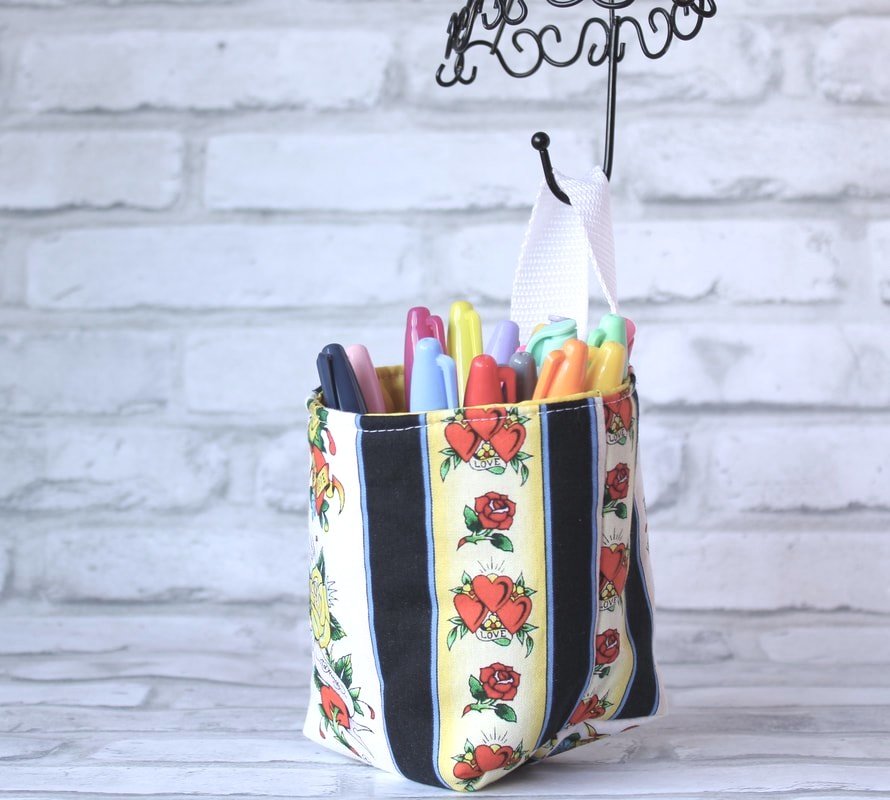
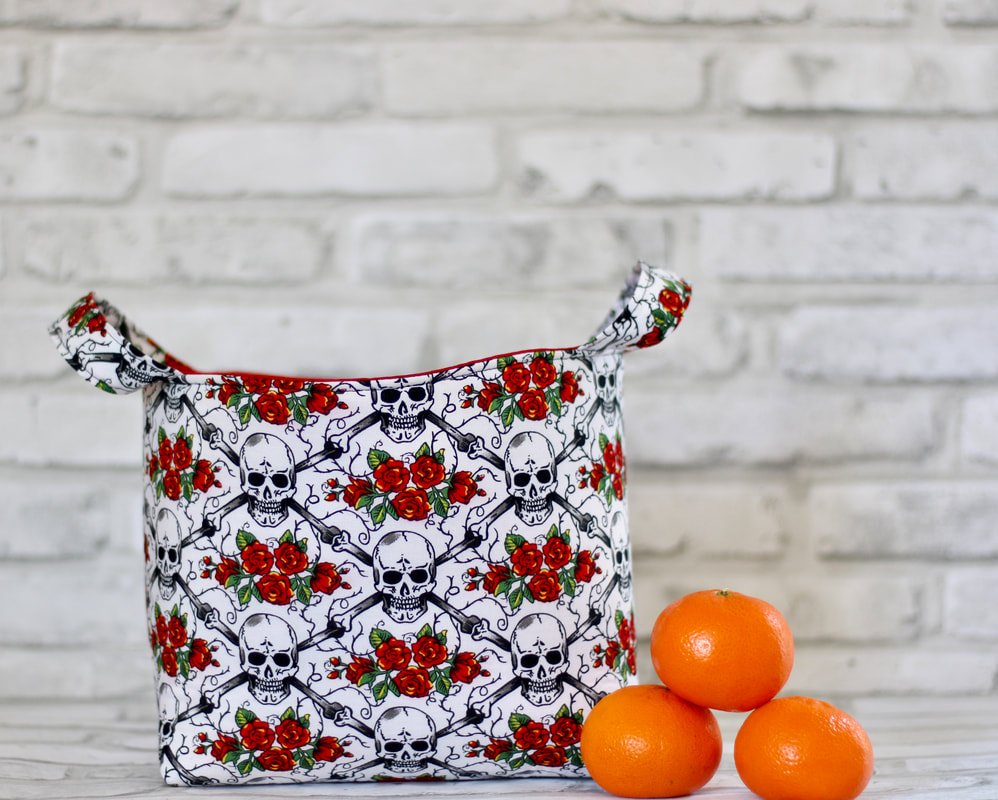
Fabric baskets or bins are the perfect small storage remedy. Keep some hand sanitizer inside a cute basket for your visitors. Make one and fill it with snacks for a new neighbor. Use them in the craft room for thread spools or fabric scraps. Or, make some fun home decor baskets for your kitchen and keep fruit inside.
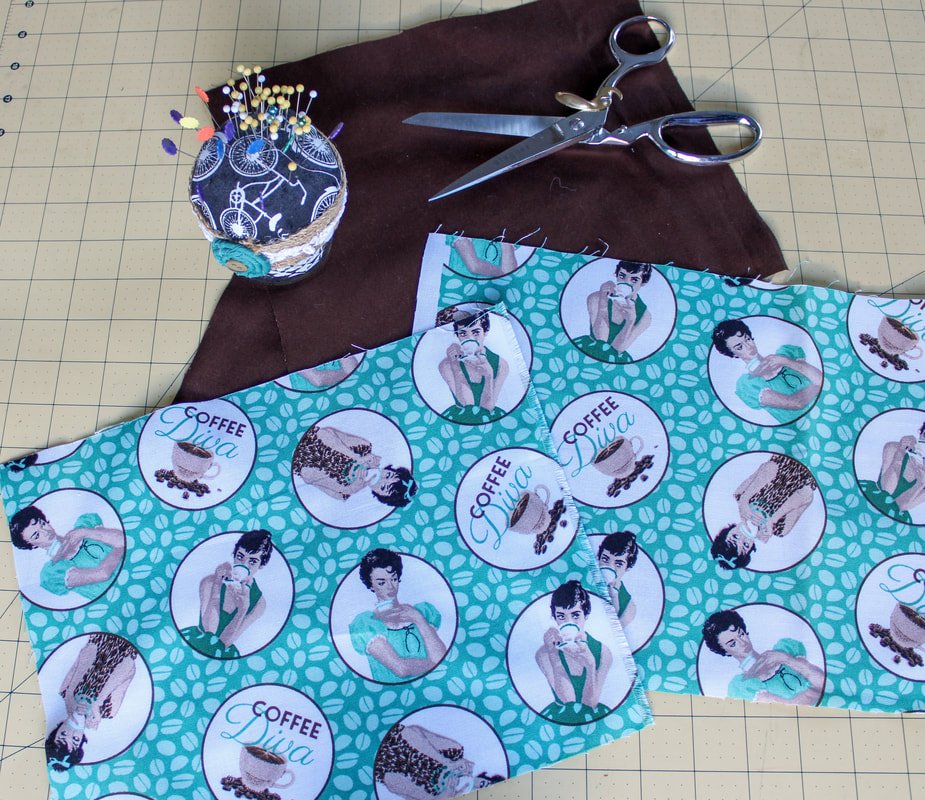
Pick out fun fabrics from your stash or purchase new styles you love. These simple to sew, fabric baskets are 100% customizable. Soon, every room will have a fabric bin. Once you make one, you'll want to make more. I promise! Yay for getting organized!
Let's get started.

Supply List:
Sewing Machine
1/4 yard (minimum) fabric for outer
1/4 yard fabric for lining
Fusible or sew-in fleece interfacing
Iron and ironing board
Matching or contrasting thread
Pins or clips
Scissors
All your other sewing notions you love
If you're looking for budget-friendly sewing options, read this post. It's long and has tons of information. If you're brand-spankin' new to sewing, start there. It's a great in-depth post even if you're a seasoned sewer.

Fabric Choices:
You want a medium to heavy-weight fabric to make fabric bins with. The fabrics listed below are great options but, experiment with what you have on hand too. Make these entirely your own. One fabric I don't recommend is stretch knit.
Canvas
Denim
Quilting Cotton
Home decor fabric
Upholstery fabric
Linen
Oilcloth and vinyl (I don't use interfacing for these fabrics)

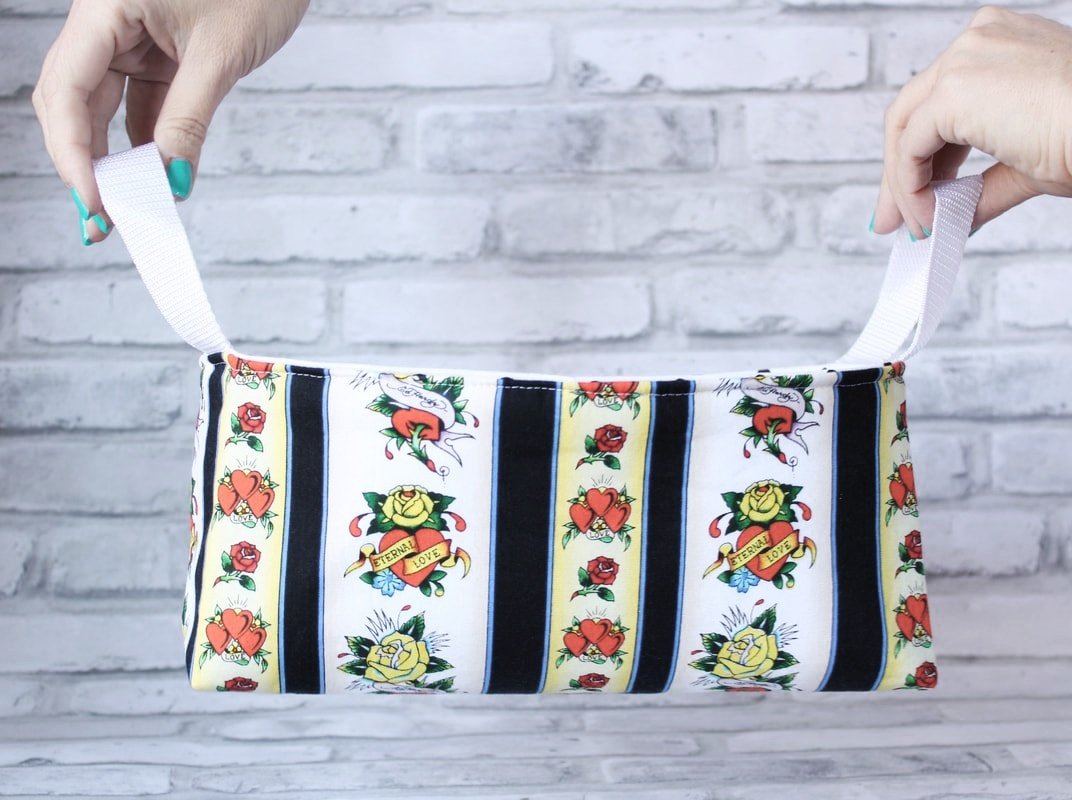
Sew a Fabric Basket:
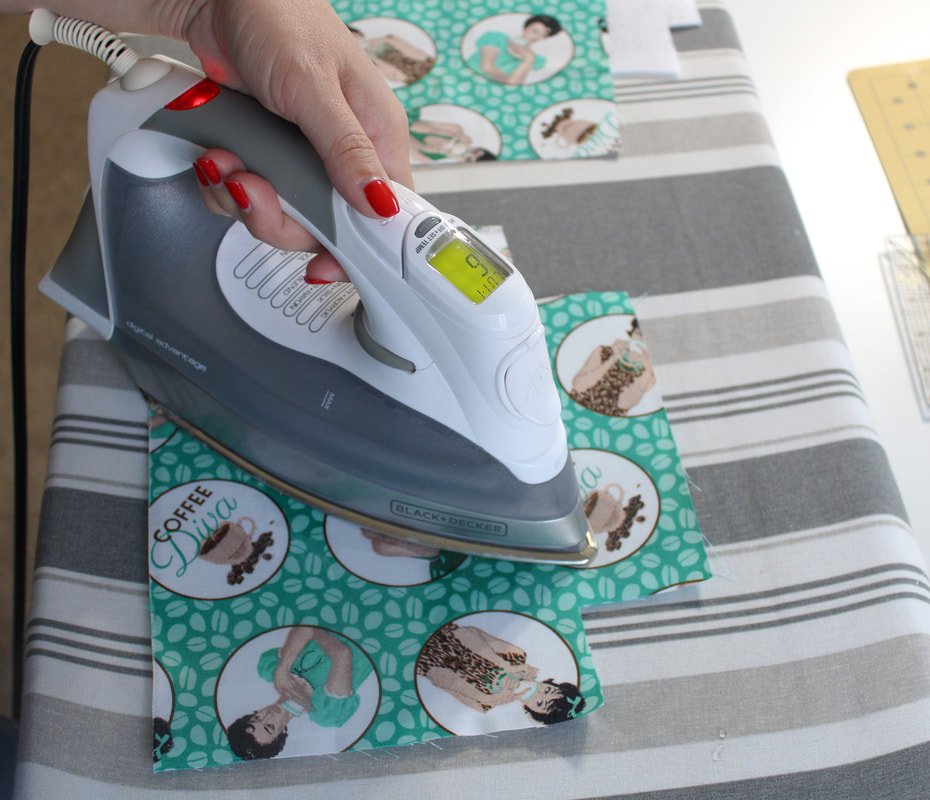
Prewash and iron your fabric. *If you are using oilcloth or vinyl, skip this step.
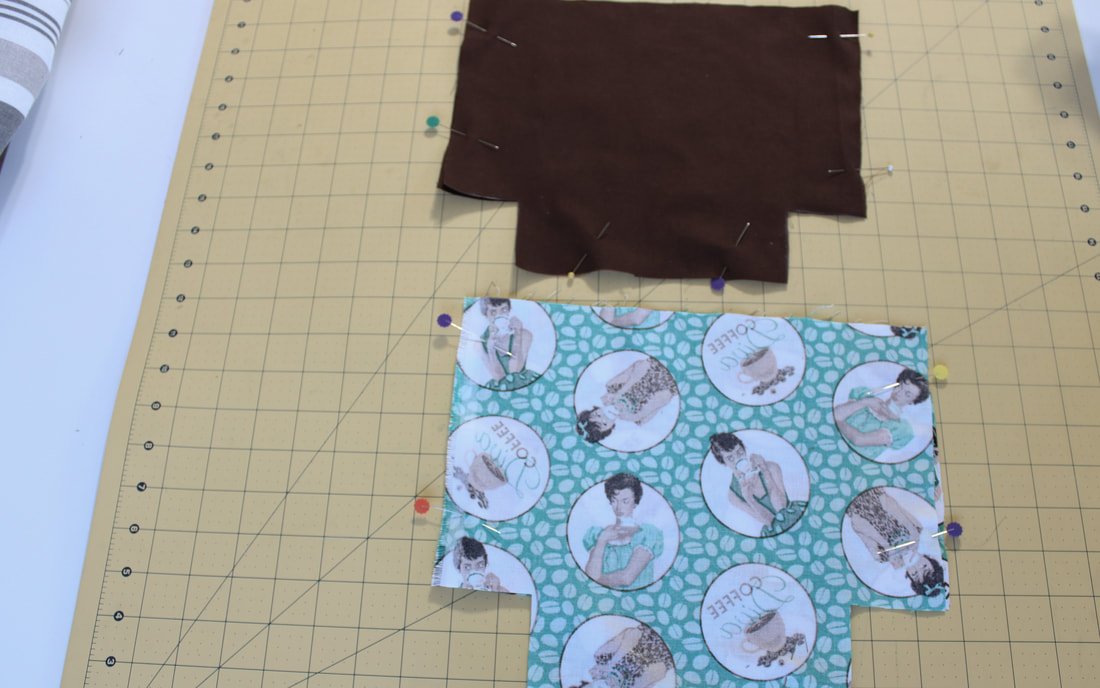
Cut 2 rectangles of your outer and 2 of the lining fabrics. Each should measure 10" wide by 8" tall. Of course, you can change this measurement. Make them longer or shorter, taller or wider. This just gives you a starting point.
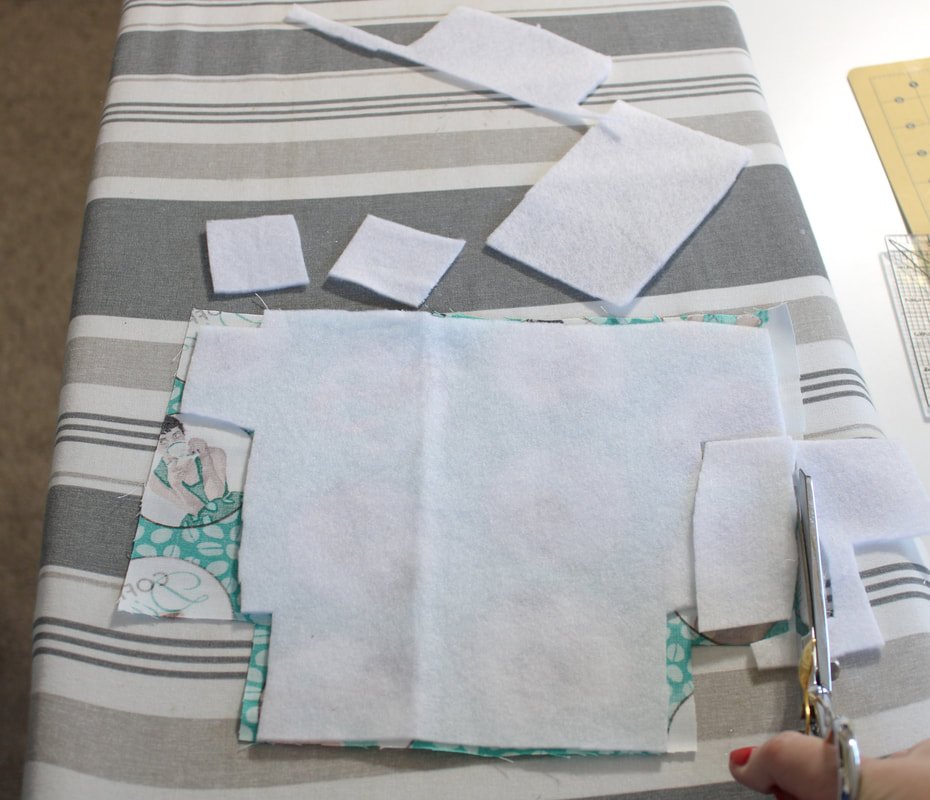
Interfacings: Cut your interfacing and add to your fabric following the package instructions.
This is where you can experiment. Use lightweight, heavyweight, or fleece interfacing.
When I make a smaller basket with denim or canvas, I tend to not add interfacing.
When sewing with quilting cotton, I use fleece or a medium-weight fusible. Find what works best for you.
Foam interfacing is really nice to use. It costs more but, creates such a nice finish and look.


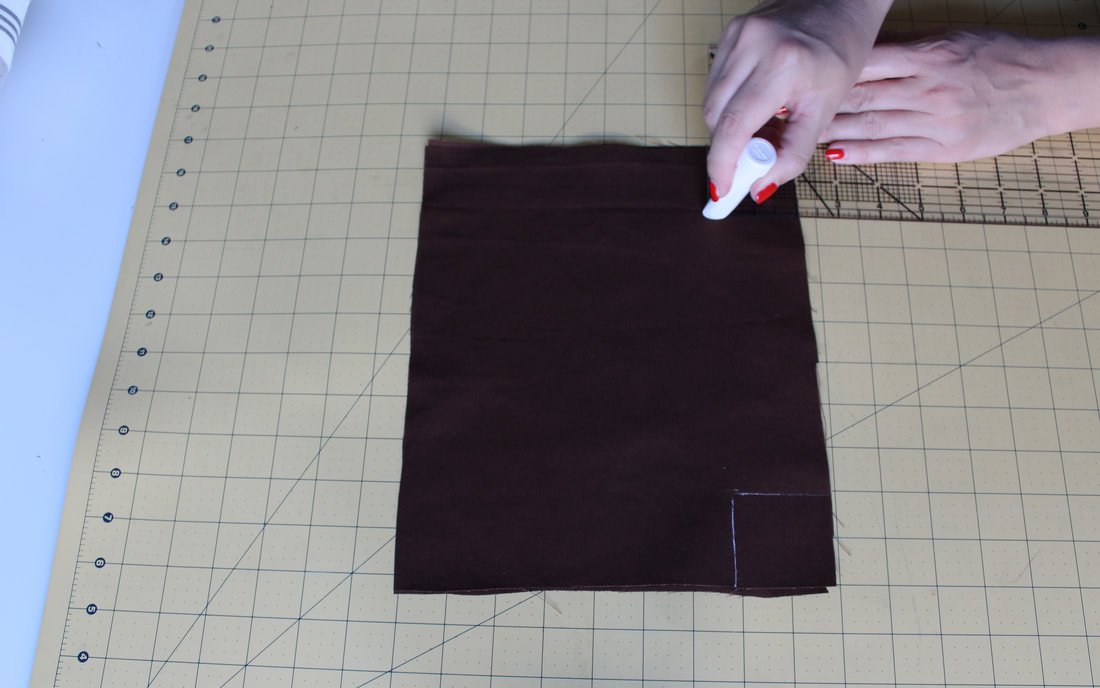
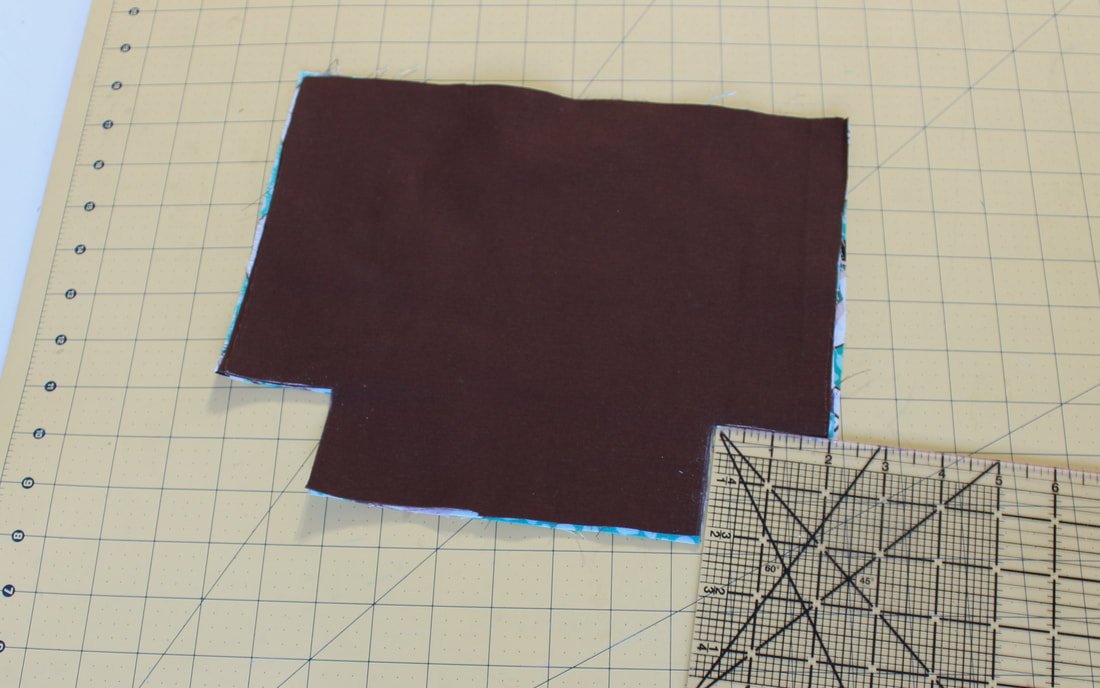
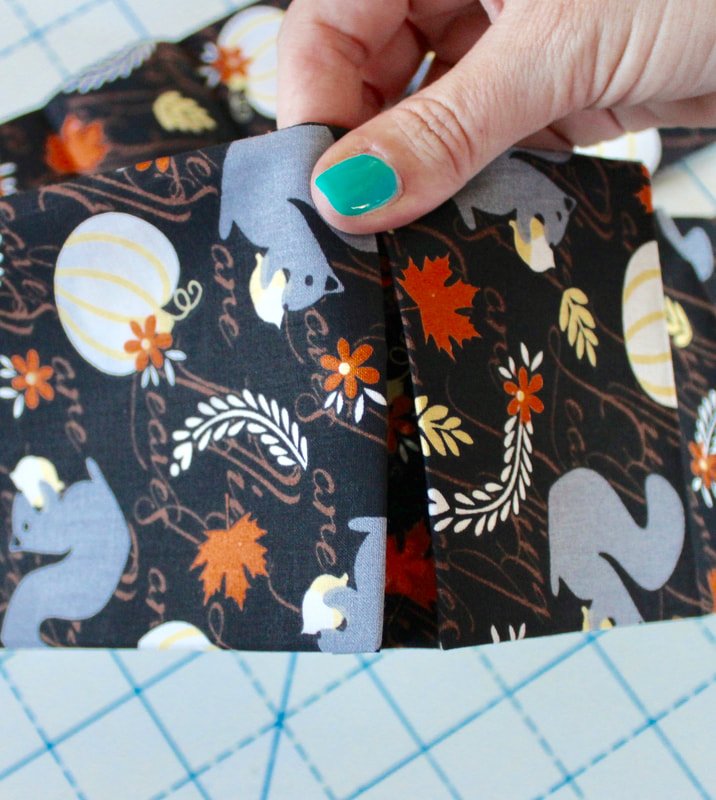
4. Cut squares into your fabric pieces. For the measurement above (10"x8") you'll measure a 2" square. Using a quilting ruler makes this part easy. If you don't have one, just mark 2" from the bottom and sides. *I like to place all 4 layers together to cut the corners. When I go to pin the sides and bottoms, I match the corners up. This ensures even corners.
If your basket is smaller, make a 1.5" square. If it's larger, mark a 2.5" or 3", and so forth.
I'm sure there's a science to it but, I can't really math. LOL
How am I a sewer, you ask? I don't know. ; -)
Interfacing Hack: Piecing it Together
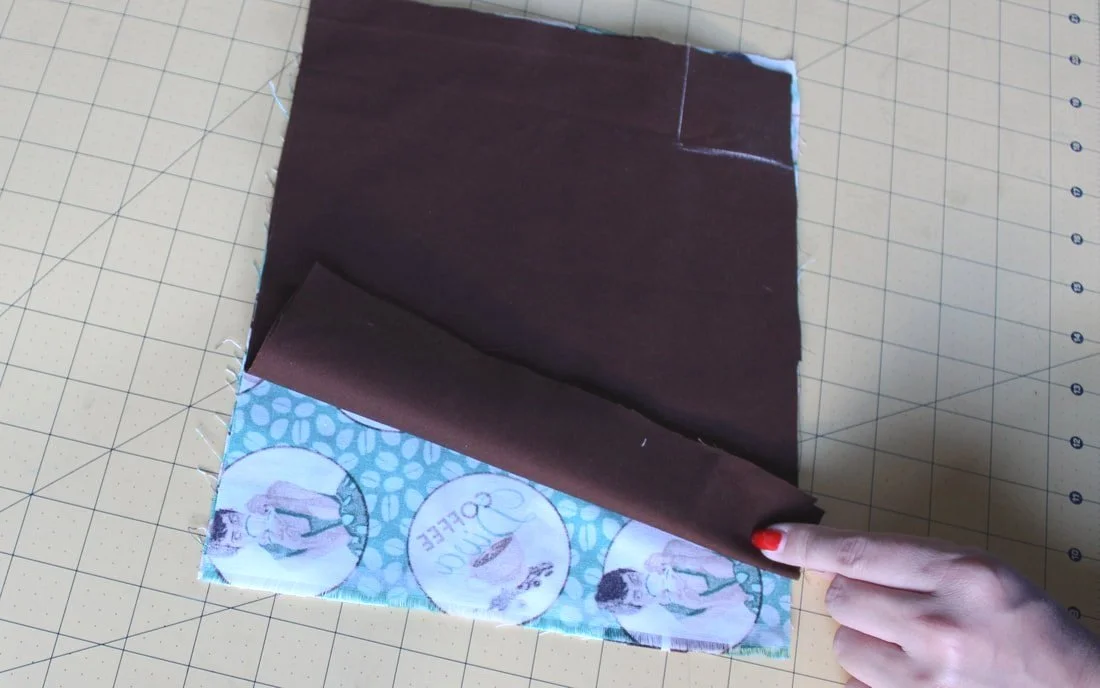
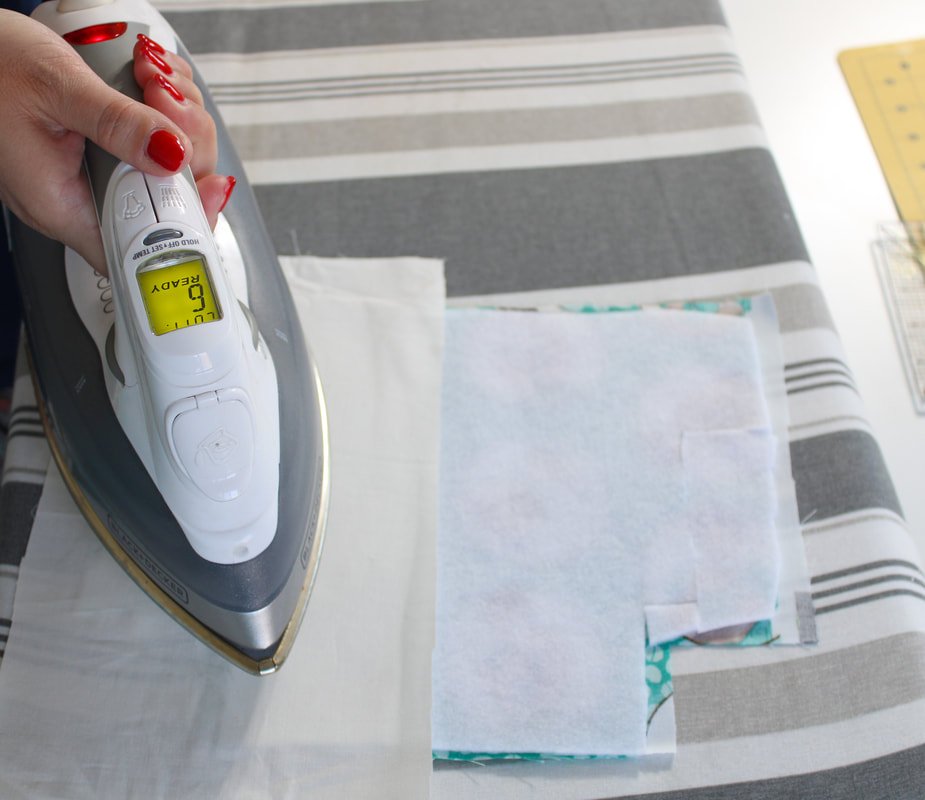
Add interfacing to the outer fabric.
Here's a quick tip on interfacing if you don't have a big enough solid piece.
If you're short on interfacing, piece it together like a puzzle. I do this more often than I'd like to admit for my projects. So, shhh, don't tell anyone. You can't tell from the correct side. Thinner pieces should overlap slightly while thicker interfacings should butt up next to each other.

Use a whole piece of fusible fleece. If you don’t have enough, follow the hack below.
Cut and puzzle your smaller pieces together. Use a press cloth on the fusible side and press. This takes a little bit more time, but it works in a pinch.
After your fabric pieces are cut, interfaced, and corners cut out, you're ready to sew!

You can’t tell the difference between the full piece of interfacing or the puzzled one.
Time to Sew
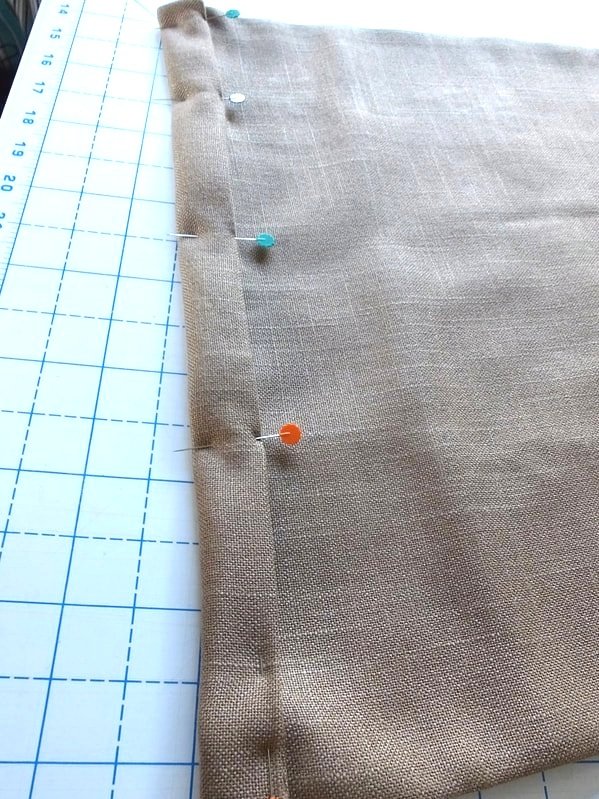
Place the two lining pieces RST and pin/clip together.
Place the two outer pieces RST and pin/clip together.
Use a 1/4" seam allowance, and sew each side and bottom together, backstitching at the beginning and end.
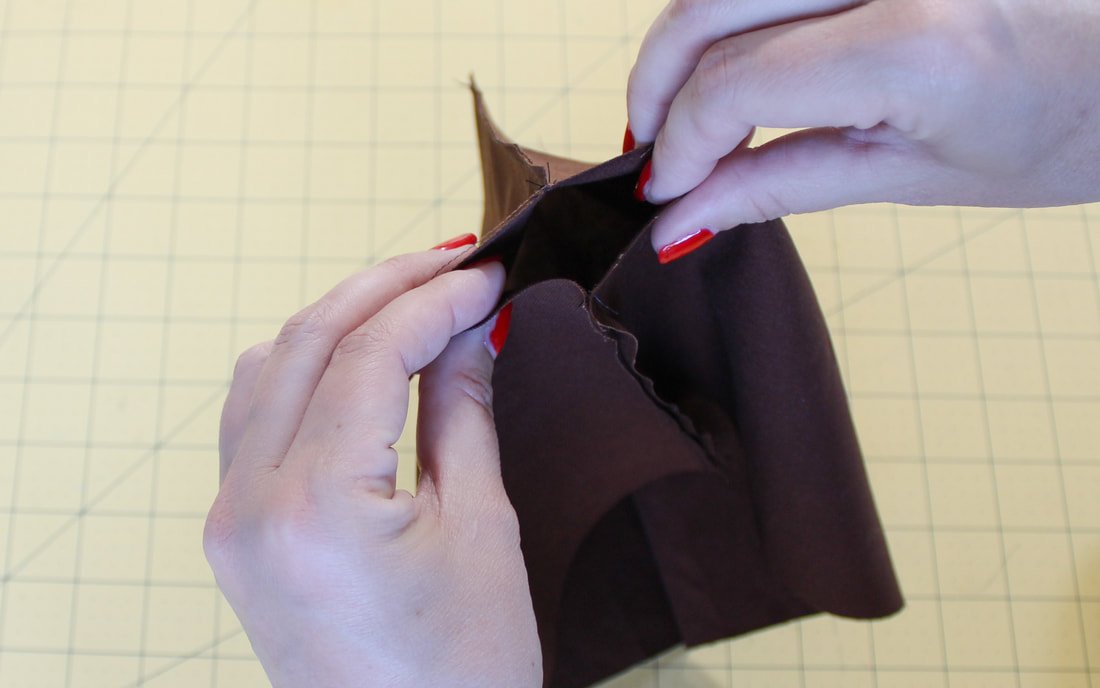
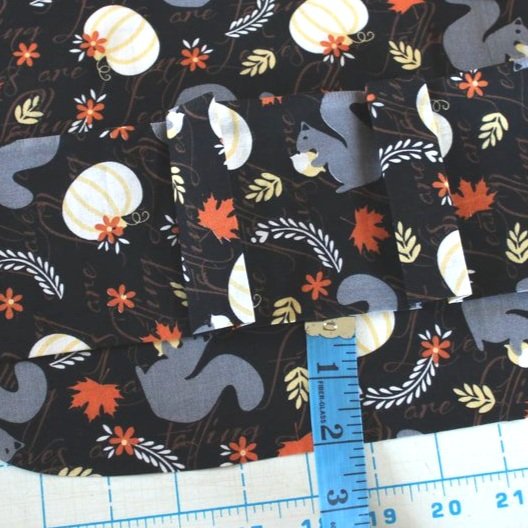
Now, sandwich the corners together to form the boxy bottom. Pinch them in the opposite direction so, the seams you just sewed are on top of each other. Pin together. It should lie flat if your cutting is exactly a square. Match up the side seams nicely because you will see them.
Sew across the small corner area with a 1/2" seam allowance. Backstitch at the beginning and end. Trim your seam allowances.

Do the same thing with the outer fabrics.

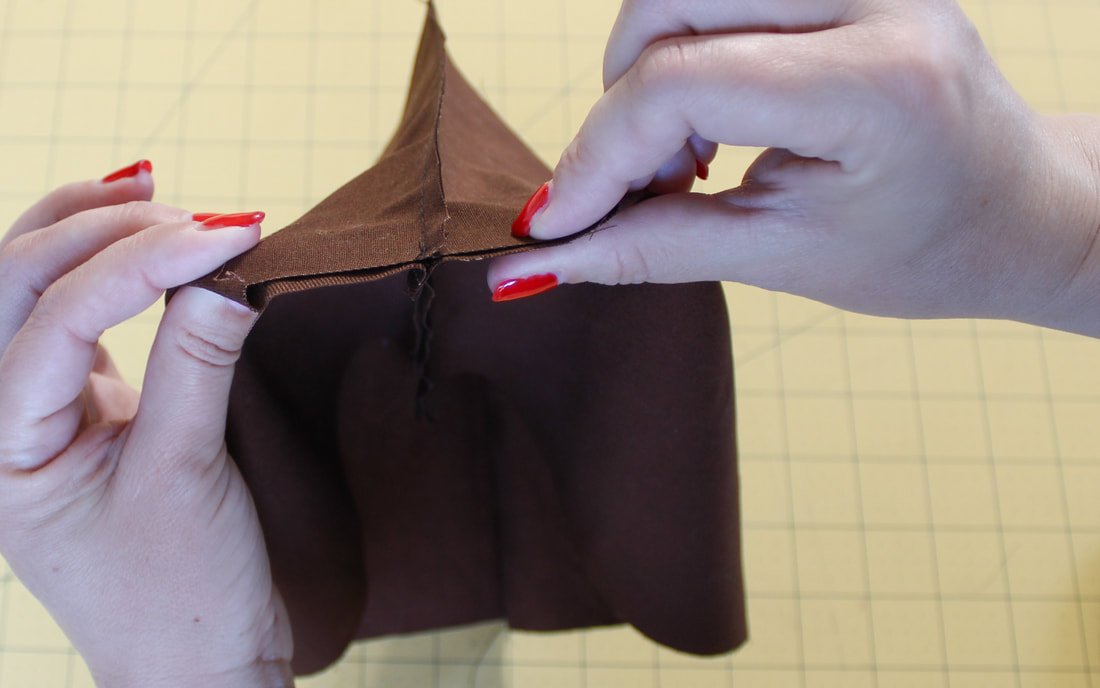
Press the side seams open as well as you can.
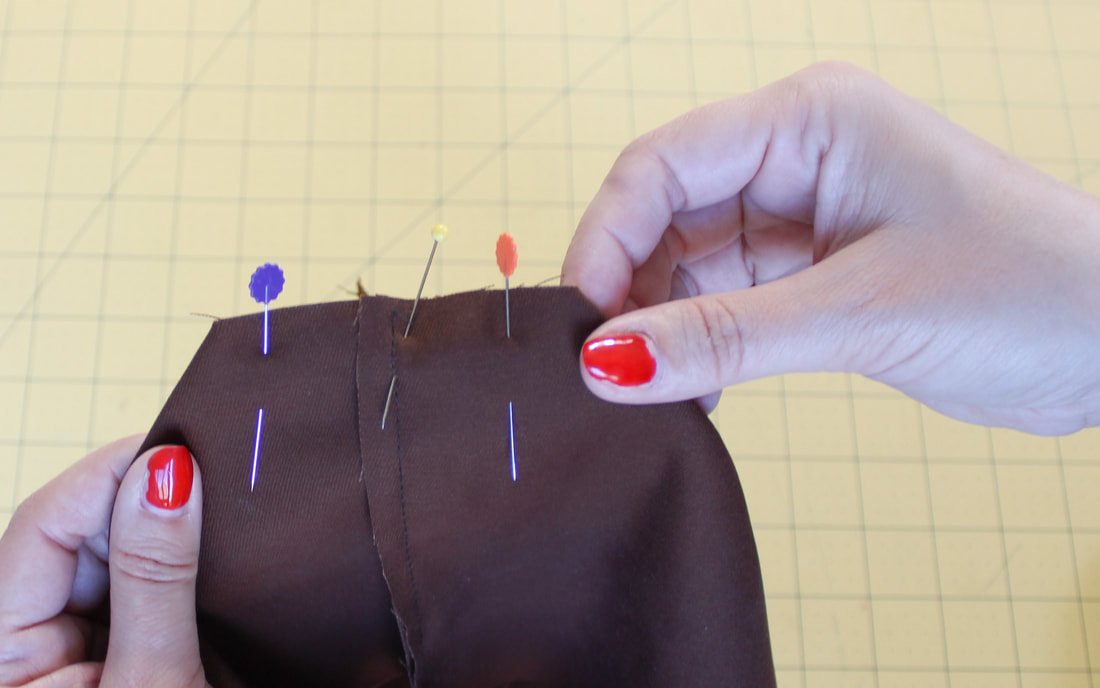
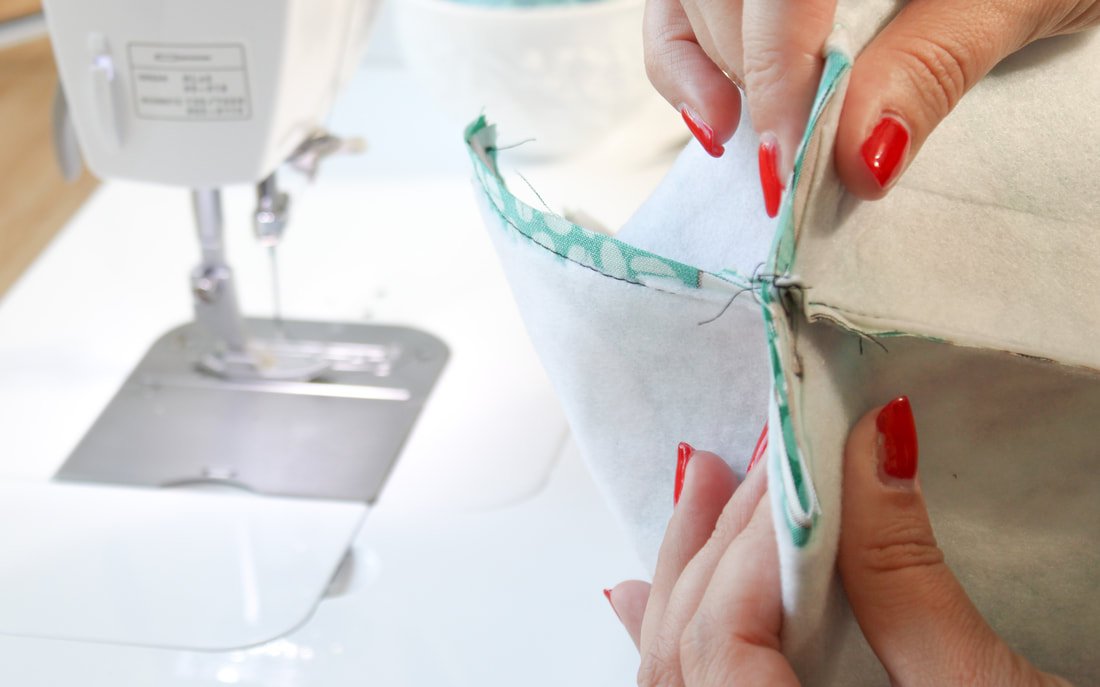
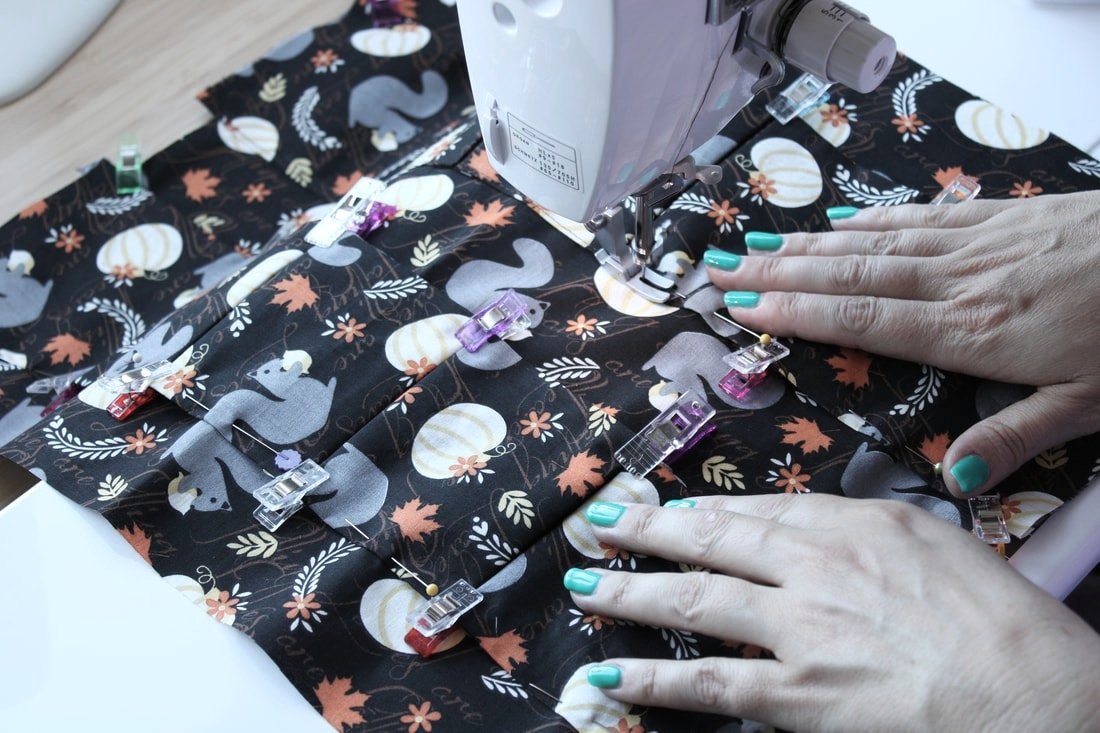
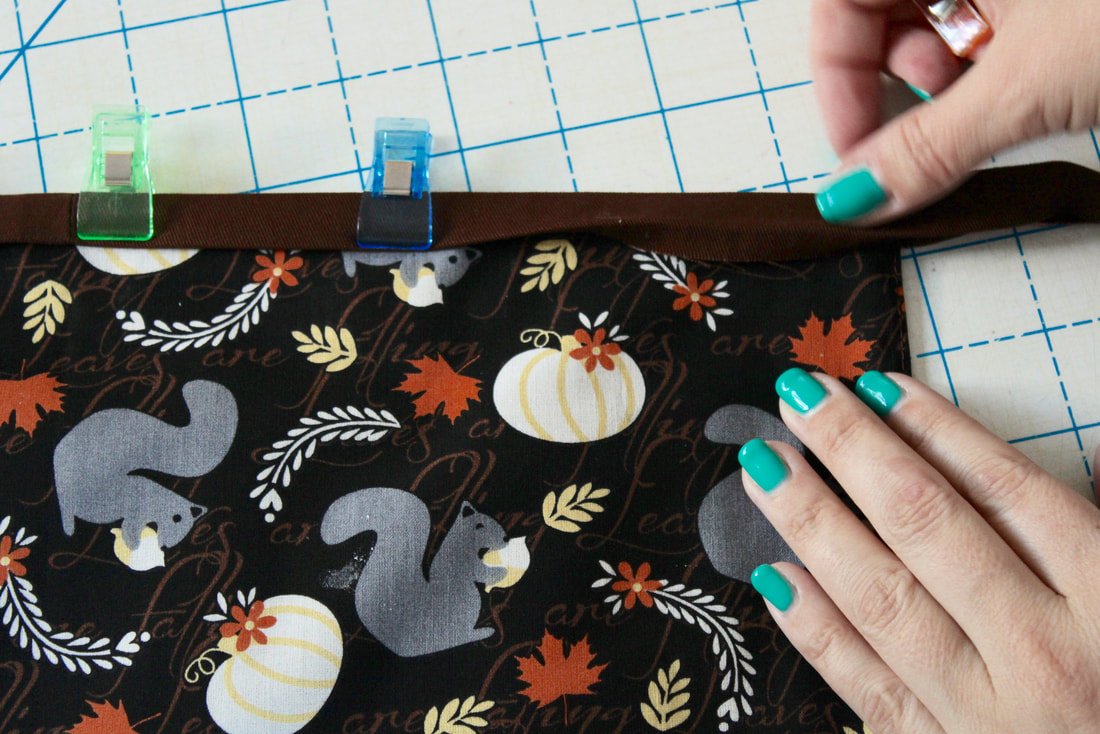
6. Turn the lining right side out. Place the lining piece inside the outer piece. The right sides should be touching each other. Pin together at the side seams first, then continue to pin around the whole top of the bin. Leave a 4" gap for turning out. You can do this at the back or along a side seam area.
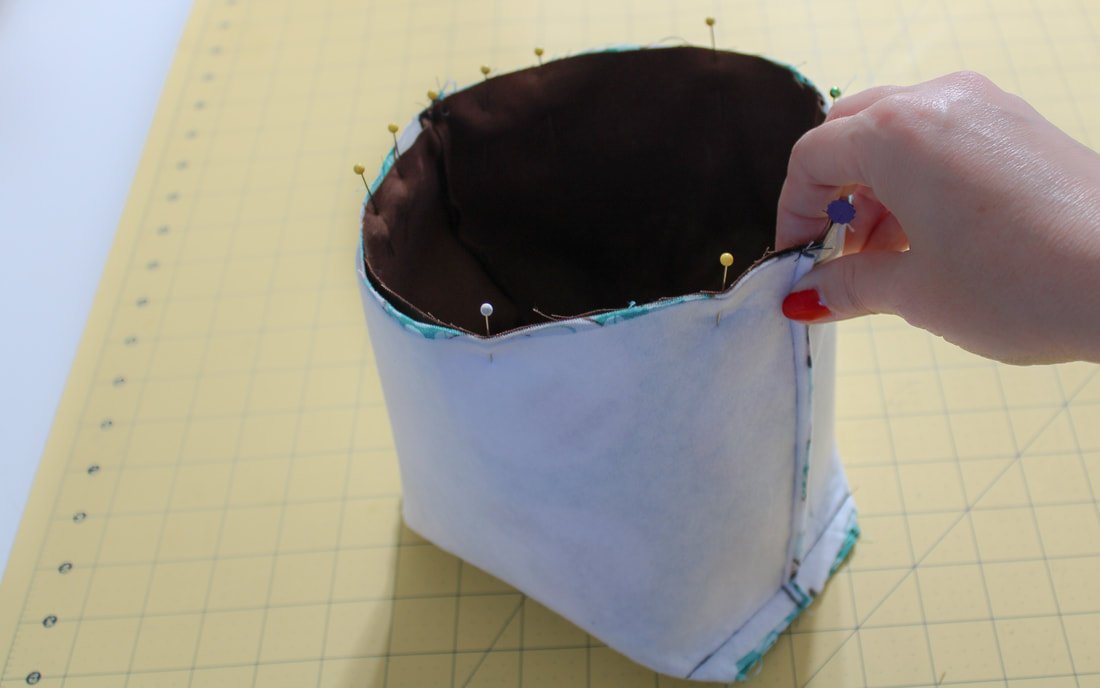

Sew the fabric basket top, leaving a gap open for turning.
7. Using a 1/2" seam allowance, sew around the whole top making sure to catch both layers. Backstitch at the beginning and end of the opening.
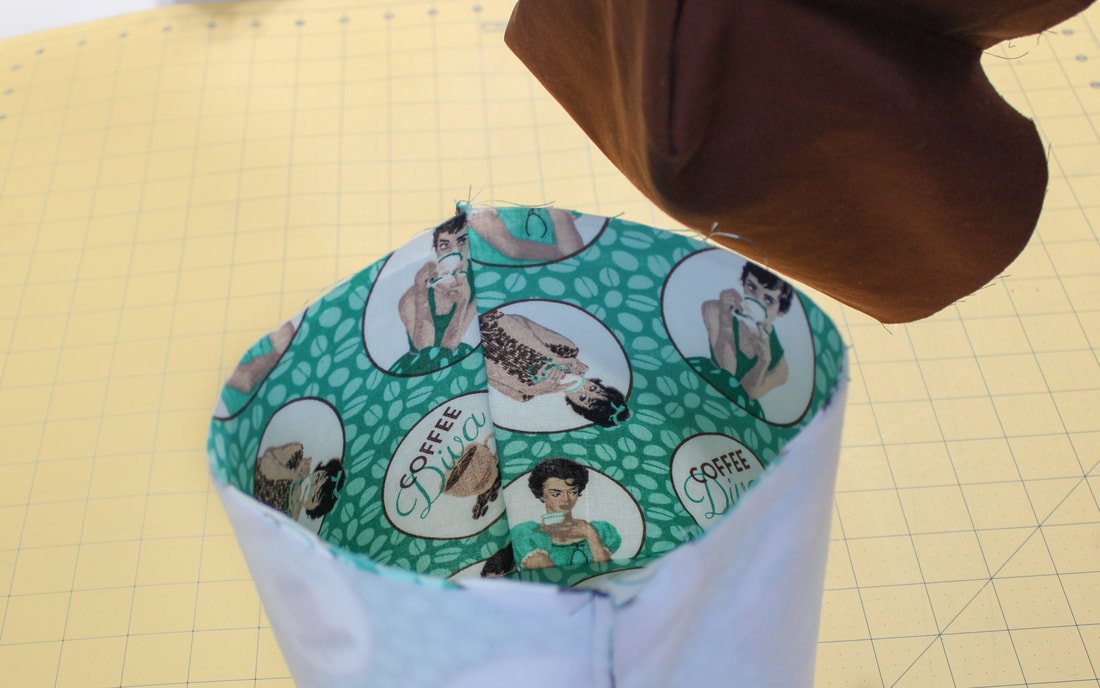
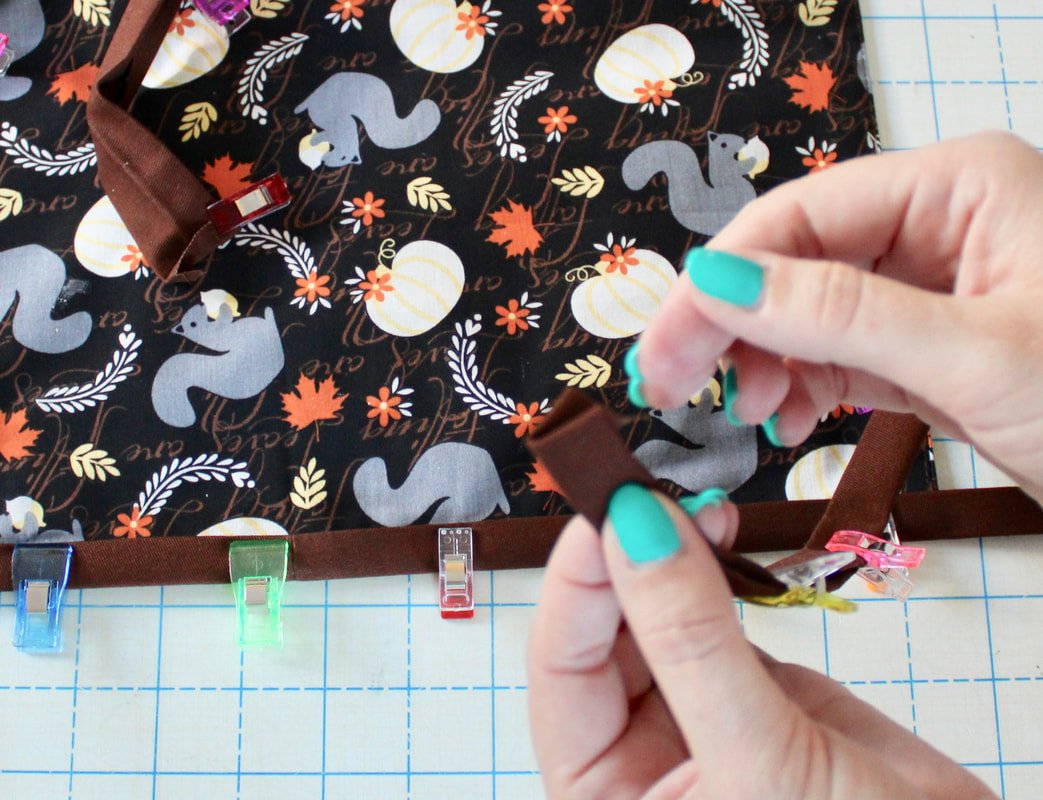
8. Turn the fabric basket out. Reach inside and gently pull out the lining through the gap you left open. Then, reach inside and grab the outer fabric and pull it out, gently. This is a little more difficult because of the thicker interfacing. Just be patient and keep pulling it out through the opening.
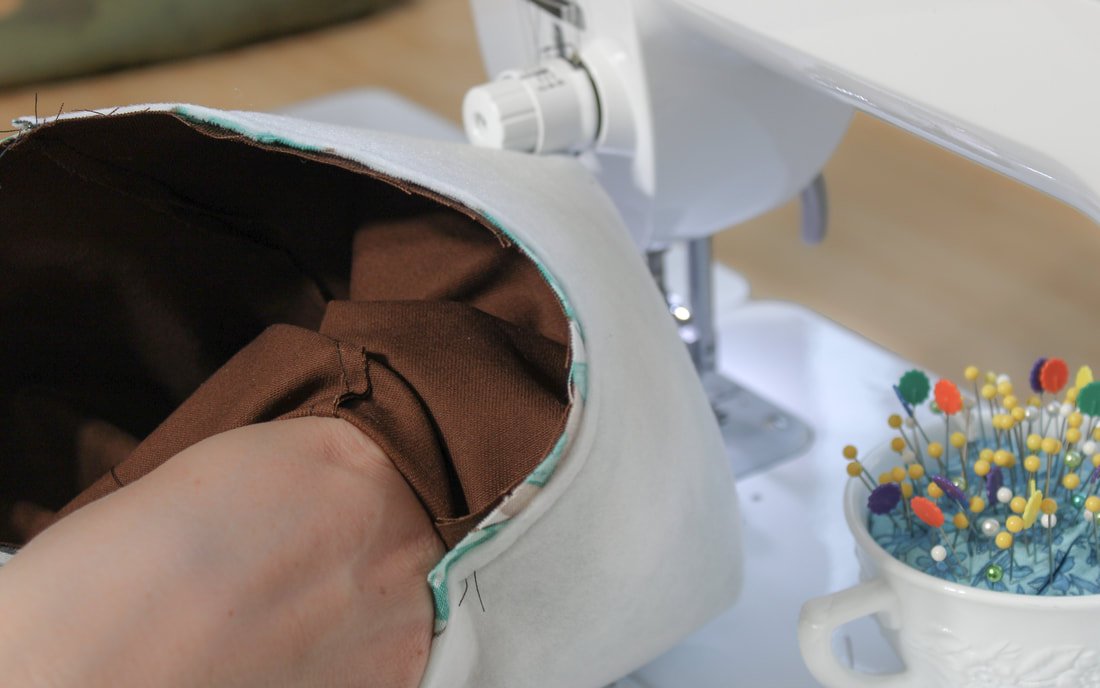
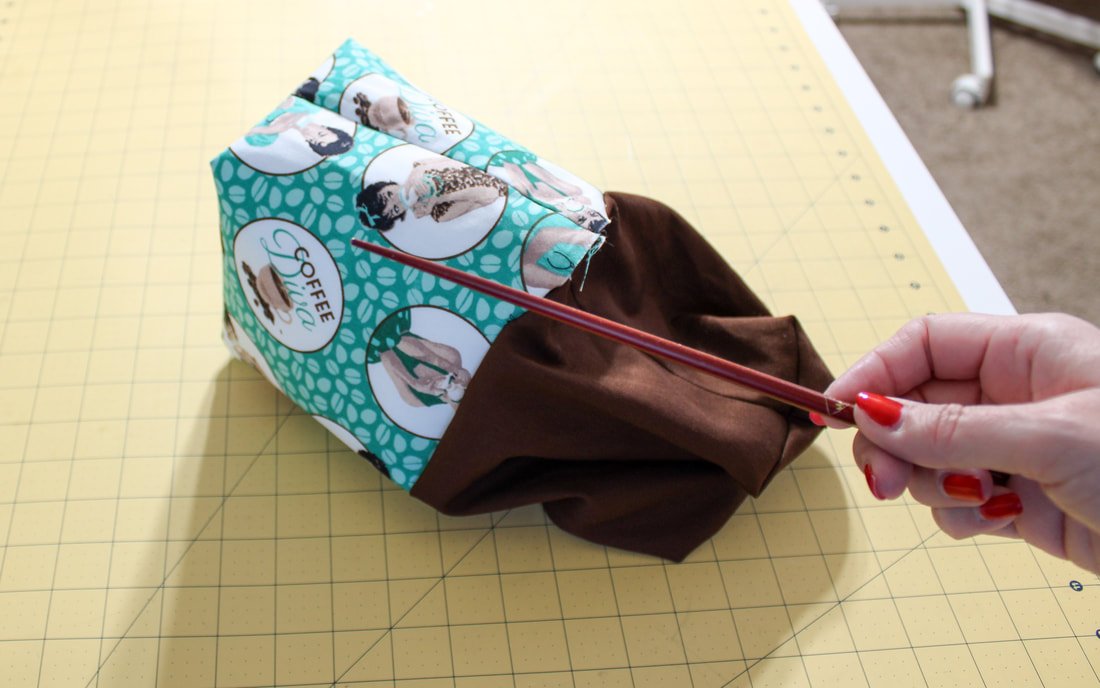
Poke out the corners using a chopstick or blunt end of a pencil. I love using my chopstick for poking out corners. My dad brought it back for me, from China, when he visited 20 years ago. It's a near and dear to me, sewing notion. :-)

Pull the lining out.

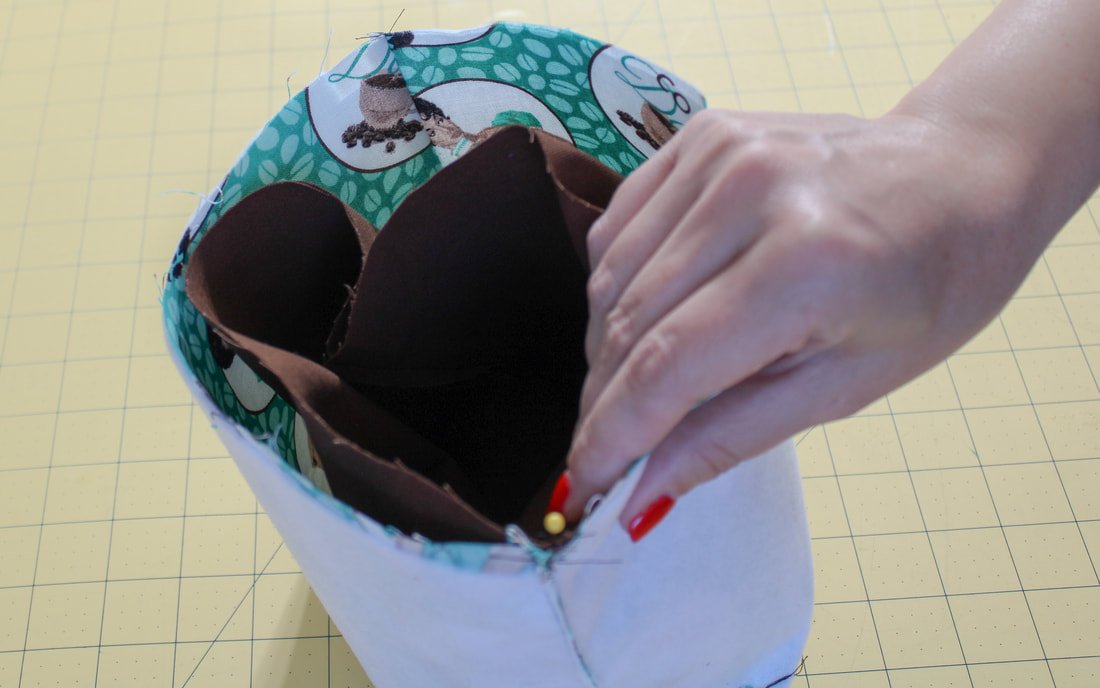
Tuck the lining into the fabric basket.

Press, then pin.

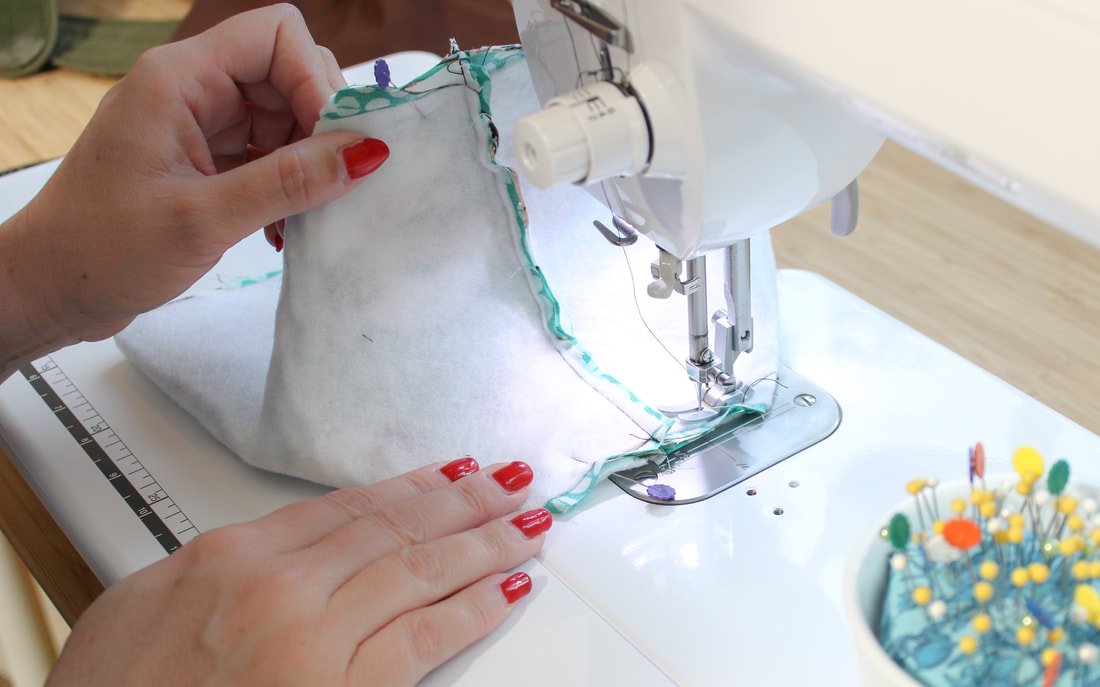
Topstitch. I used a second row of stitching for this particular fabric basket.
Check your seams. Make sure everything is neat and tidy. No interfacing is sticking out or fabric that wasn't sewn in, accidentally. No puckers either. If anything is happening that you don't love, grab that seam ripper.
9. Push your lining back down into the basket. Press the top edge with your iron to flatten out the seam bulk.
10. Last step! Pin the opening closed, and topstitch around the whole top. You can even do a second row of stitching using the edge of your pressure foot as a guide.
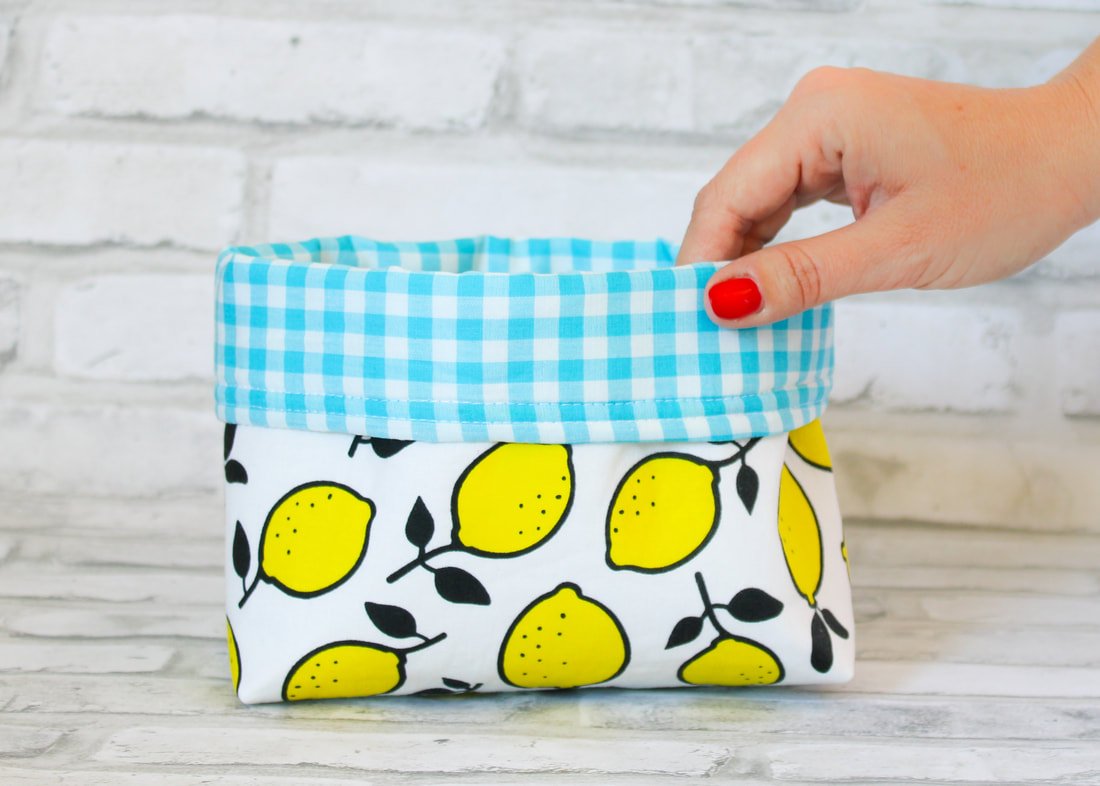
That's it. You're done! Go fill it up with whatever fun things you have that need a home.
It looks like a lot of steps but, it's not. Once you make a simple fabric basket, you'll want to make more. They're great for storing all the little things and big things. Just follow the interfacing guide above and experiment with different fabrics and sizes. You can add handles or loops for hanging too. Make an extra-long loop on a bin to use for a trash bin inside your car. There are endless possibilities for these little baskets of fun.
Share in the comment section what you plan to use them for.
XO,
Annette
More Options
Play with sizing. Make them tall. Make them short. If you're unsure if the sizing will work for your needs, use scrap paper to staple the pieces together. Add a handle or two. These are meant to be customized for your own use. Have fun with them!

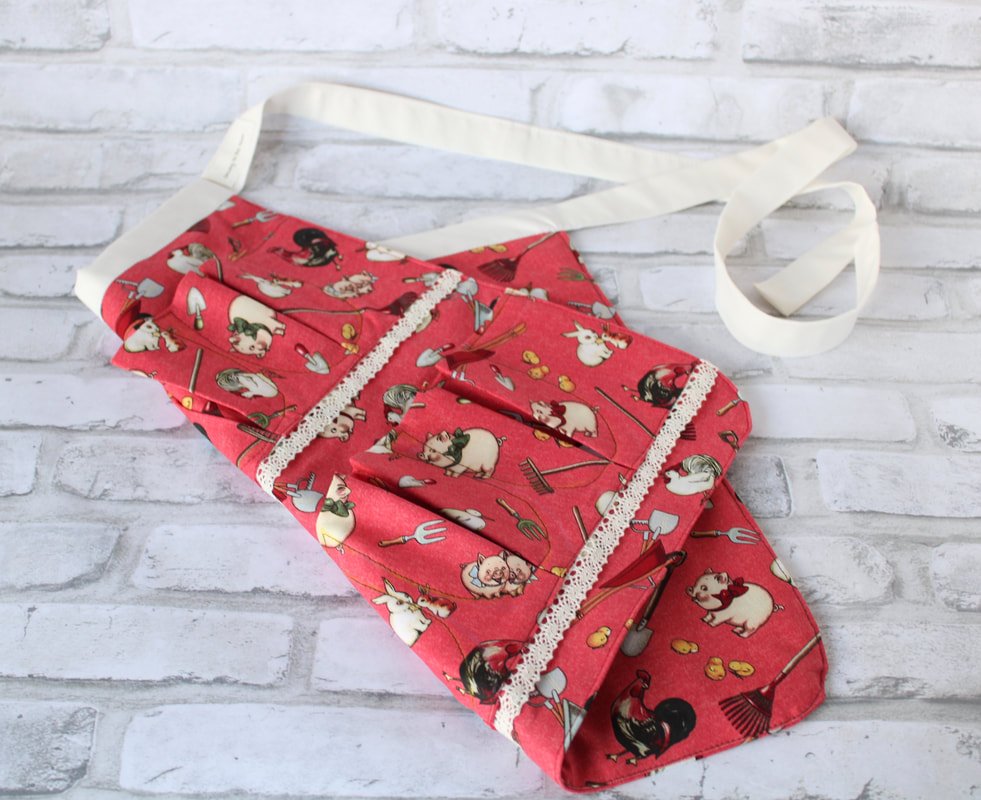
Egg Gathering Apron
Collect your chicken eggs with a cute apron. The pockets keep the eggs safe and snug inside. Free sewing pattern for backyard farmers.

Got eggs? If you have a hobby farm or small homestead, you probably have hens. And, if you have hens, you have eggs. So. Many. Eggs.
Well, you need something to gather all those eggs with. A bucket works, a basket is cute, and in a pinch, you can use your hands and coat pockets. We've all been there. ;)
But, wouldn't it be fun and albeit easier to use an egg apron? Yes! You can live out your farm life dreams with a sweet egg-gathering apron.
So, it's decided. You're going to make an apron for collecting those little breakfast nuggets. Besides, buckets are only made for livestock grain and treats anyway.

Supplies
Swoon Patterns Egg Gathering Apron pattern. This is free on their website. Grab it here.
Sewing machine, thread, and notions
1/2 yard medium weight fabric
1 1/4 yards contrasting fabric (I didn't use a contrasting fabric)
1 1/4 yards lightweight fusible interfacing
Chalk pen or erasable pen
Ruler
Clips and pins.
I chose to use the Swoon Patterns egg gathering apron. This was the coolest egg-collecting pattern I found while scouring the internet. I collect about a dozen eggs every morning and wanted an apron to hold eggs and keep them safe. It also needed to be comfortable for me to wear.
Many patterns had pockets that were sewn in a way that didn't seem secure. If you were to bend over (to pet the cat or clean out the coop) the eggs would fall out. Swoon Patterns created an egg apron that is pure genius! It involves a little extra sewing but, is well worth it in the end.
I promise!
Let's Make an Apron
Grab the FREE pattern, print it out, and tape it all together. Decide on the size(s) you're going to make. Simply fold over the pattern for the different adult sizes. You don't have to trace off a new pattern, and it'll work perfectly. For this tutorial, I made the child size.
Let’s Get Sewing
First, apply your interfacing to the pieces following the pattern instructions. I used canvas as interlining because I was short on interfacing. I skipped using it on the main pieces. Secret lazy sewist tip. You're welcome.
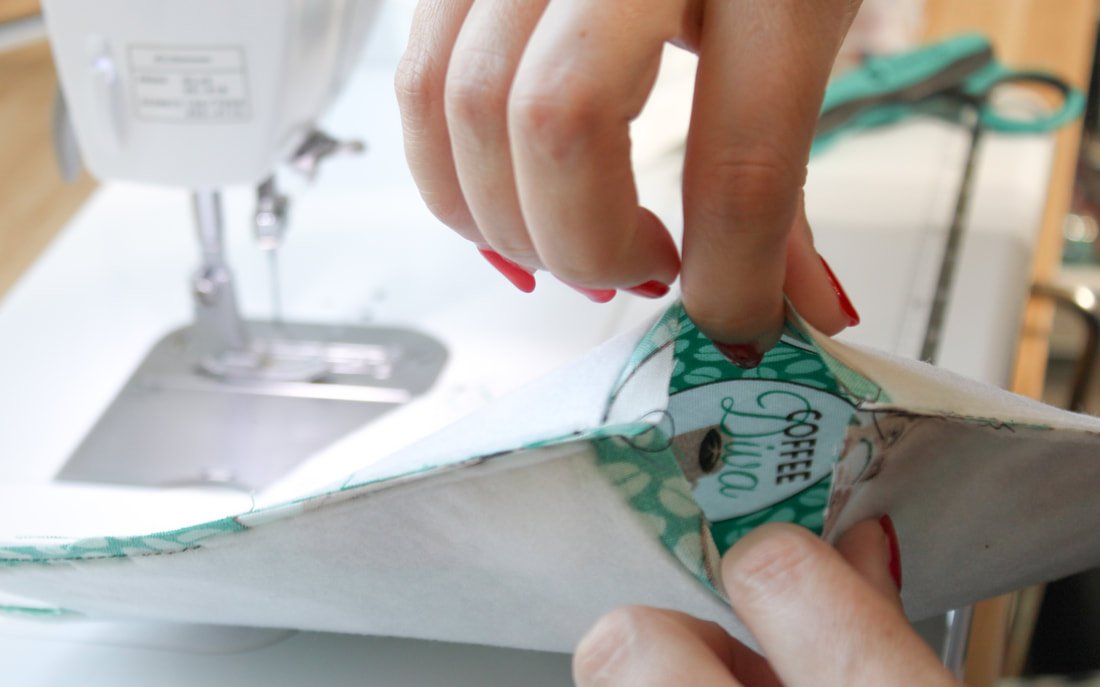
After the pieces are cut and interfaced. You're going to make the pocket portions. Sew the long pocket panel RST (right sides together) along the long edge to form a tube. Turn out and press. Repeat with the other pocket panel.

Sewing the apron
My littlest sewing buddy making her own egg gathering apron.

Mark the fold lines.
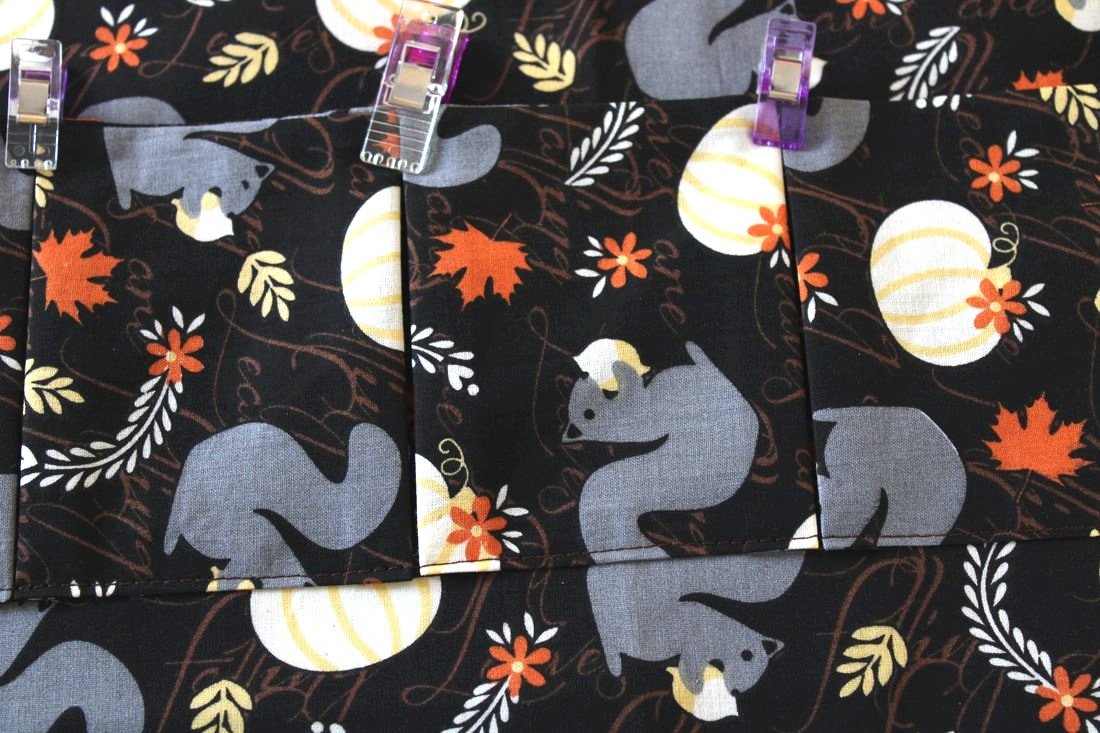
Next, grab your chalk or erasable pen, and ruler. Mark the heck out of the pocket tubes. Per the instructions, use your ruler to measure the distance from the edges and between the pockets. It helped to make the vertical lines a few inches long. You'll then take these tubes to the iron and press them.
Once the pockets are pressed, grab clips and pins to pin and clip the panel in place. I used pins to keep the pocket tubes attached to the apron. Clips kept the pocket folds together. I used a tape measure and the pattern to place the pocket panels in the exact places.
Topstitch the bottom edge of the pocket panel to the apron, removing pins as you go. I took this part very slowly. No pedal to the metal here.

Use pins to hold the bottom edges down. Clips keep the pockets folded together.
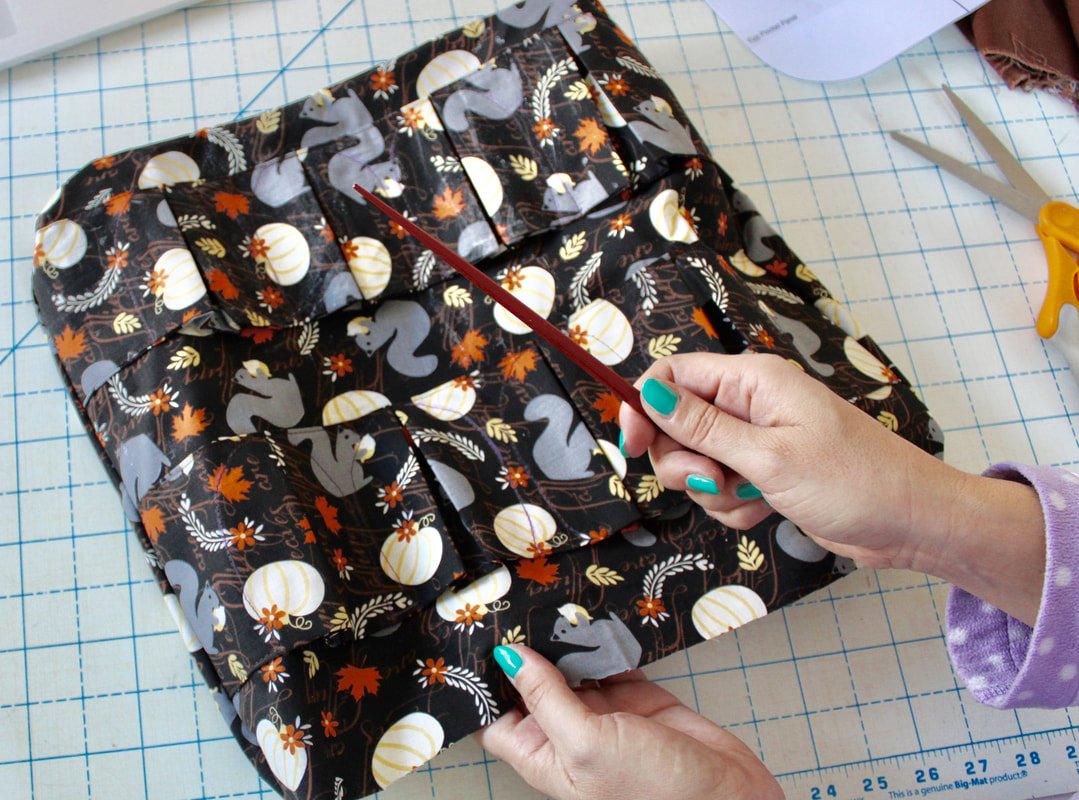
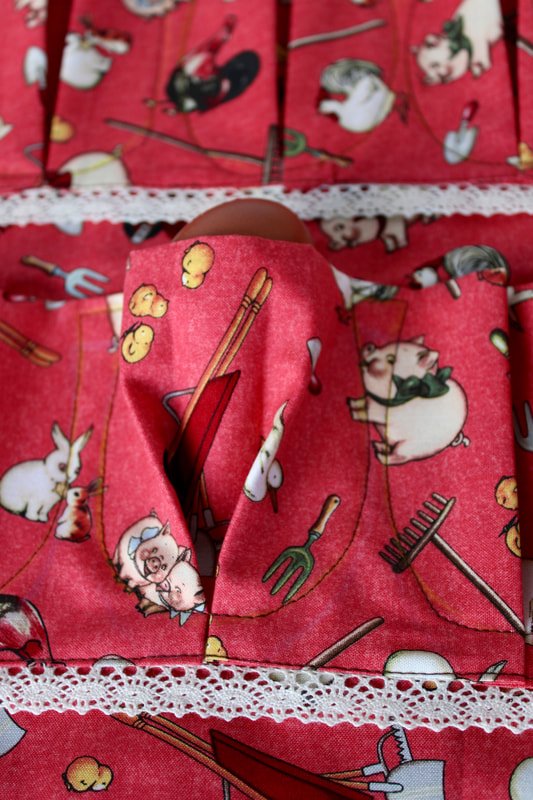
The Egg Shaped Pocket

Now it's time for the fun part. Grab the pocket stitching guide piece. Choose chalk or erasable pen to trace.
Line the top and bottom fold with the pattern piece. Trace the shape to create the egg pockets. You'll make 8 for the child size and 10 for an adult-sized apron. I found that clipping the piece helped to keep it in place while I traced.
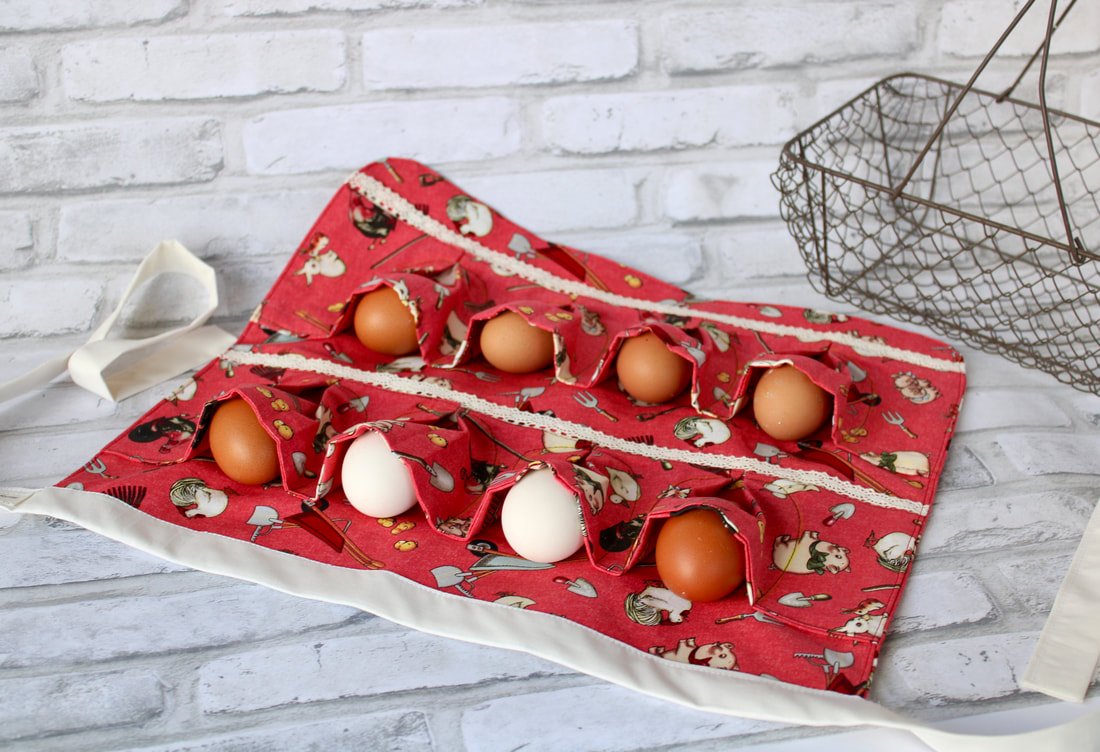
This part is where the Swoon Pattern really shines! The egg shape cradles the egg like a cup, inside the apron. Unless you're hanging upside down, they can't move around.

Continue tracing the pattern shape onto the apron for both pocket panels.
Starting on one side, sew around each egg shape pocket. Go slowly, this is a lot of circular sewing. I hand cranked the wheel a few times around the edges.
After the pockets are finished, it's time to sew the apron back and front pieces together, RST. Sew the sides and bottom only. Clip your curves. Trim seam allowances.
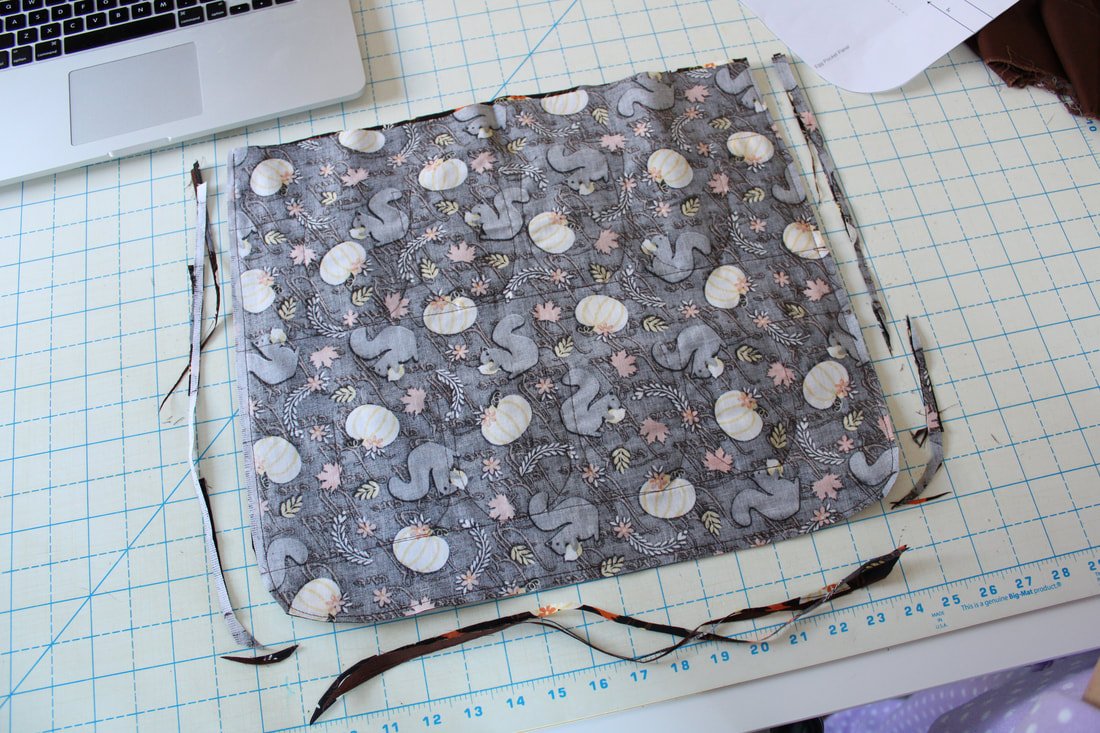
Yes, I made this apron while wearing jammies. Aren't they considered fashionable apparel these days? Haha
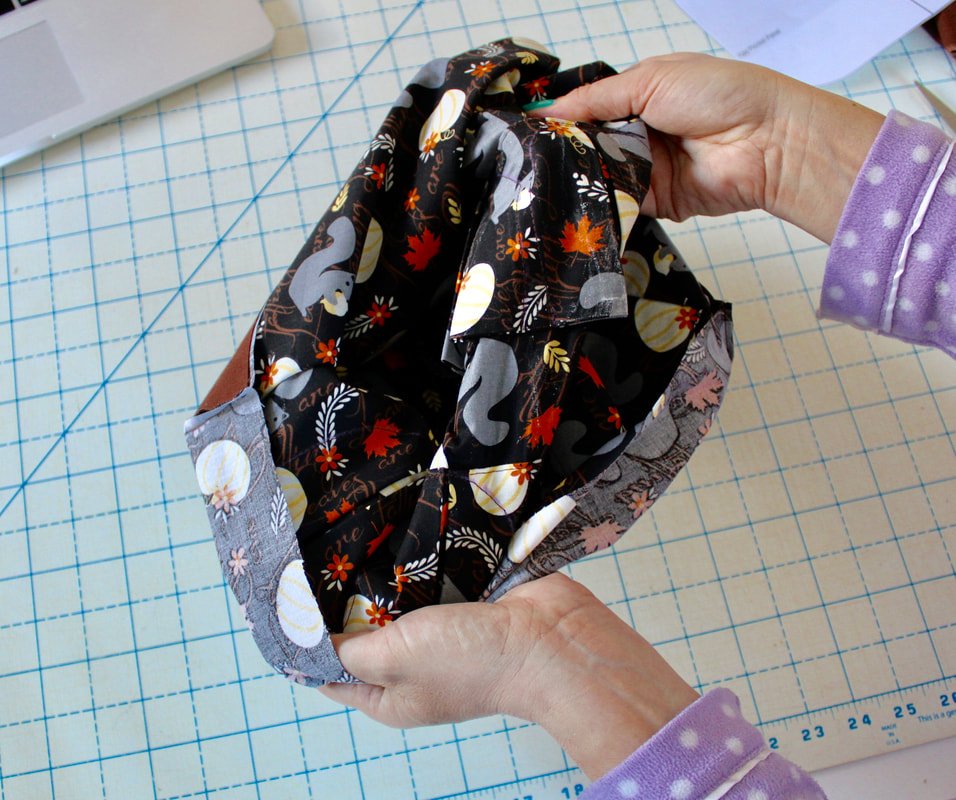
Turn the apron right sides out. Grab your chopstick or other turning tool to push out the corners
Waist Strap

Sew the waist tie like you would with any other piece of bias binding.
Make the waist strip following the instructions. Match the raw edge of one side to the top edge of the apron. Sew in the folded area where I'm pointing.
*You can see my chalk marks on the egg pockets still. They'll go away when I brush the fabric with my hand and spritz some water on the area

Fold the other side over. Use clips to hold in place.

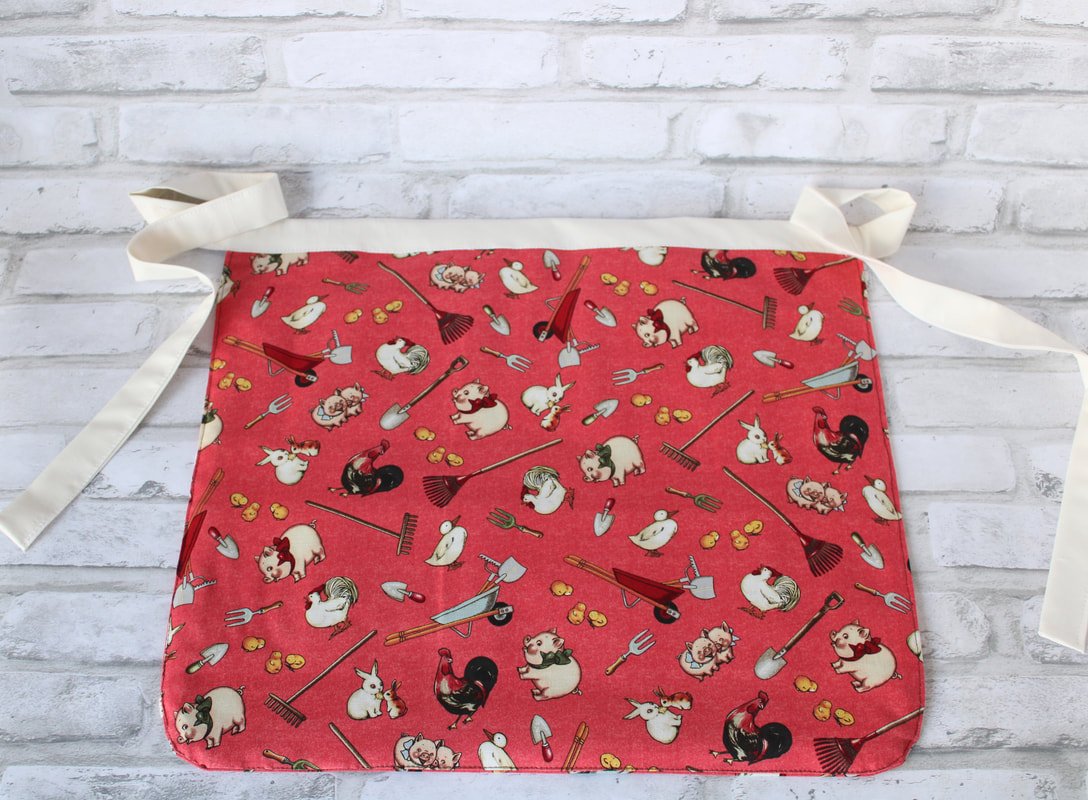
Your apron is finished! Hooray!!! Now, go gather some eggs and don't forget to take treats with you. The girls work hard for their eggs.

Notes on the Pattern
I didn't really change anything. This pattern was great. In the instructions, they tell you to baste the raw top pieces together. I skipped that because it seemed unnecessary. If a child or beginner is making this, then maybe that step shouldn't be skipped.
I prefer a narrower waist tie than what was called for. But, that's a personal preference.
After making the first apron, I was commissioned to make a few more as gifts. I sewed them the same as well. There wasn't anything I wish the pattern had or didn't have. It's a wonderful pattern and I'm thinking of making a few to add to my shop. I think every chicken mama and papa needs one of these aprons!
I took close-up photos with another one I made. The light-colored fabric makes it easier to see all the details.
This apron is the best egg-collecting apron in my opinion. I can usually put 2 small eggs in each pocket. It keeps the eggs safely inside the pocket while I change bedding, change water buckets, and refill the feed buckets.

This is the child sized apron. It holds 8 eggs. I am in love with how this turned out. I love the lace detail, it’s so sweet.
Now that you've made an apron for the eggs, I am curious...
What do you make when you have oodles and oodles of eggs? We usually opt for a frittata or an angel food cake. Those seem to disappear pretty quickly in our house.
I hope you make one of these aprons. It's such a useful farmer’s tool. And a cute tool at that!
Happy gathering!
Annette


DIY Advent Calendar
Sew up your own Advent Calendar this year. It’s an easy DIY Christmas project that will bring smiles for years to come.

Are you itching to do some holiday sewing? This advent calendar is a quick-ish sew if you want to whip up a fun Christmas item now! Get some stash-busting done too.
Tools needed:
rotary cutter or scissors
ruler
1/4 yard of a few different fabrics or scraps
1/2-3/4 yard of sturdy solid fabric for the front and back. (duck cloth, canvas, denim, etc.)
Matching thread
Iron on numbers, cutting machine with HTV vinyl, or template for sewing them on, if you don't embroider them.
All the sewing notions and a machine
A piece of 1/2" wooden doweling and twine for hanging.

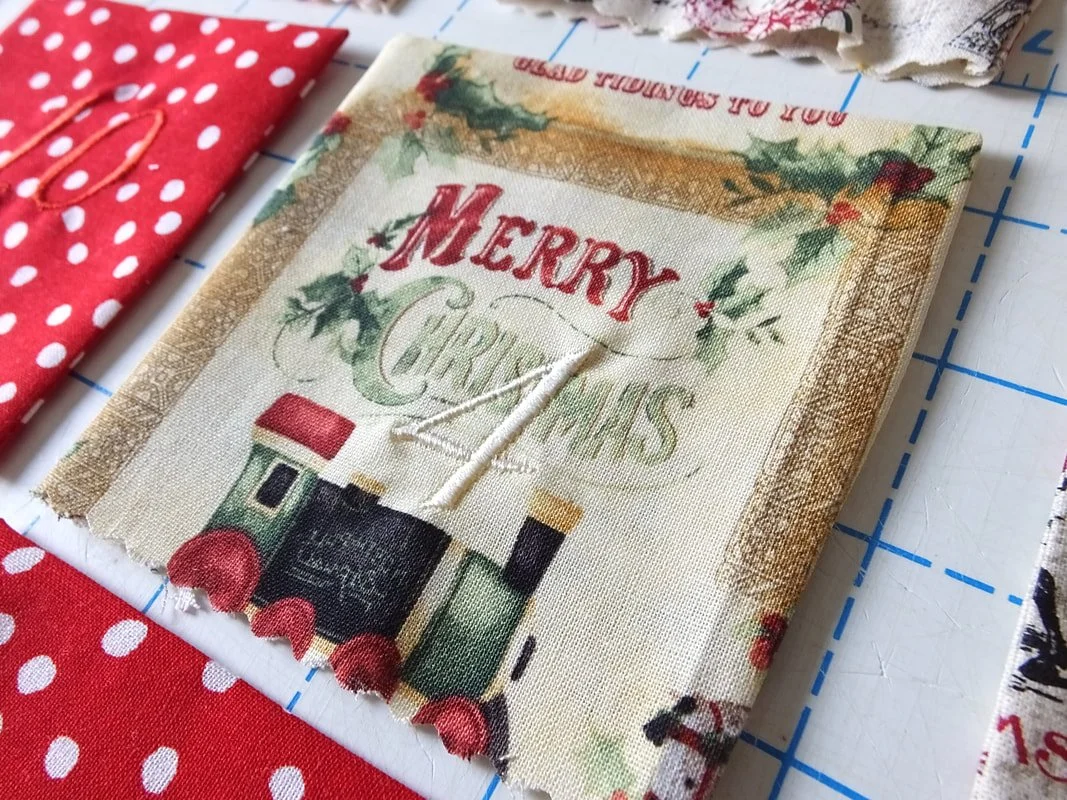
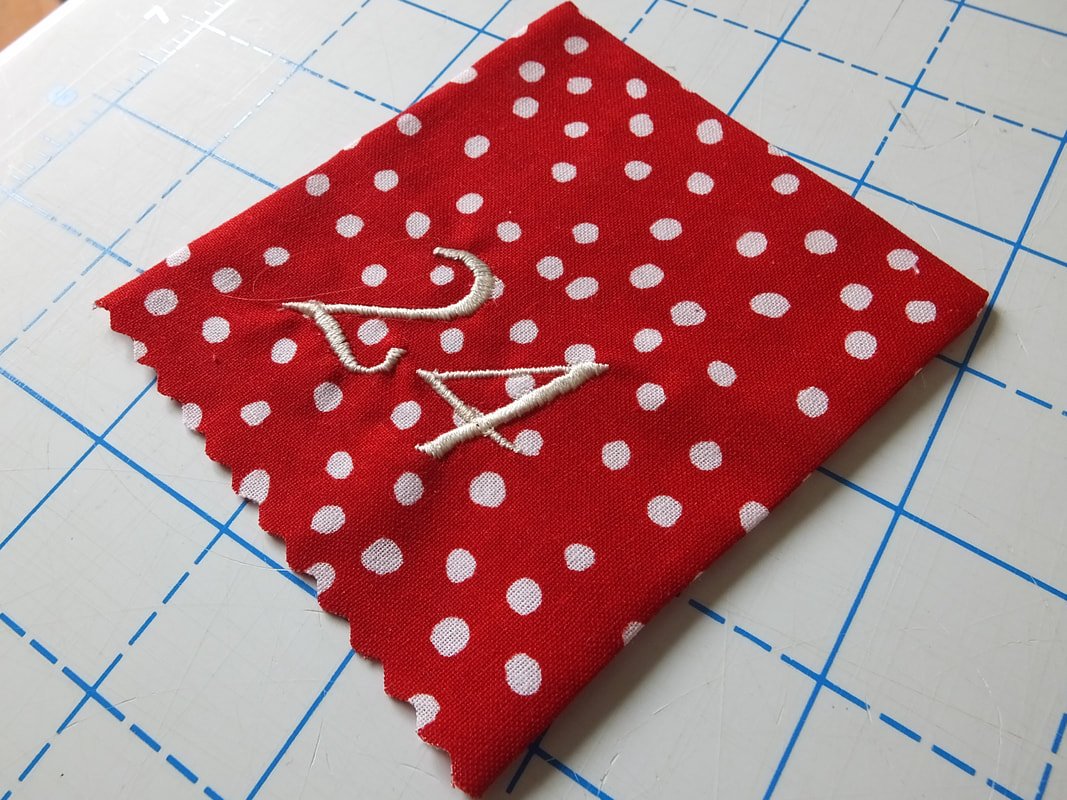
Machine embroidered numbers on pockets
I chose Christmas fabrics similar in color, grabbed them, and started cutting. I liked the size of my phone, so I used it as a pattern. Find something around the house that is the size you want, and use that as a pattern template.

My phone roughly measured 6.5" by 3". I added 1 inch to the width and length for seam allowances to make rectangles. Fold them in half RST (right sides together) and stitch with a 1/2" seam allowance. Sew the sides only. Leave the bottom open, clip corners, turn out, and press flat.
**If you decide to sew or embroider the numbers on, do this before sewing the pocket together. If you use vinyl or iron-on numbers, you can add the numbers after the pockets are sewn and turned.
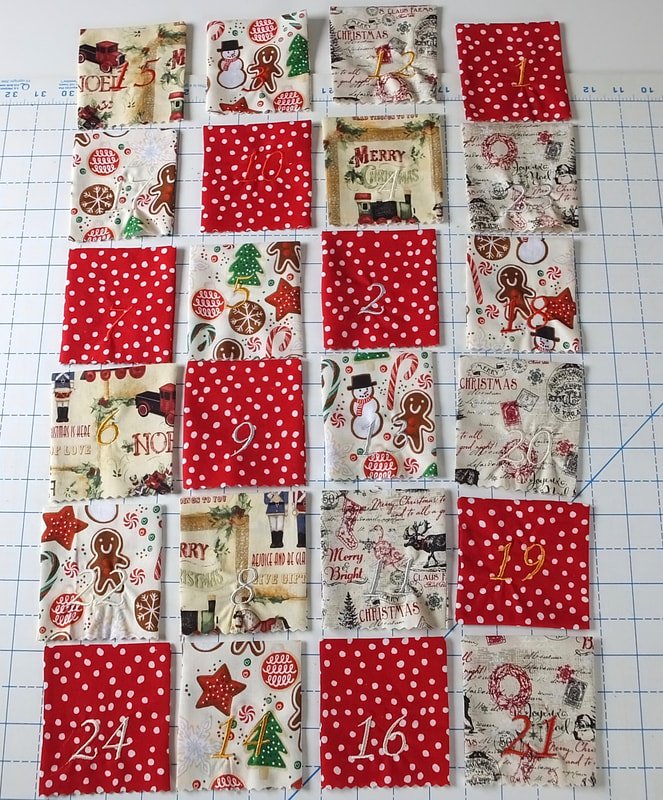
Organize them vertically if you’d like.
After you have your pockets made, lay them out and switch around until you decide which assortment you love the best or go crazy. I liked the taller version better.
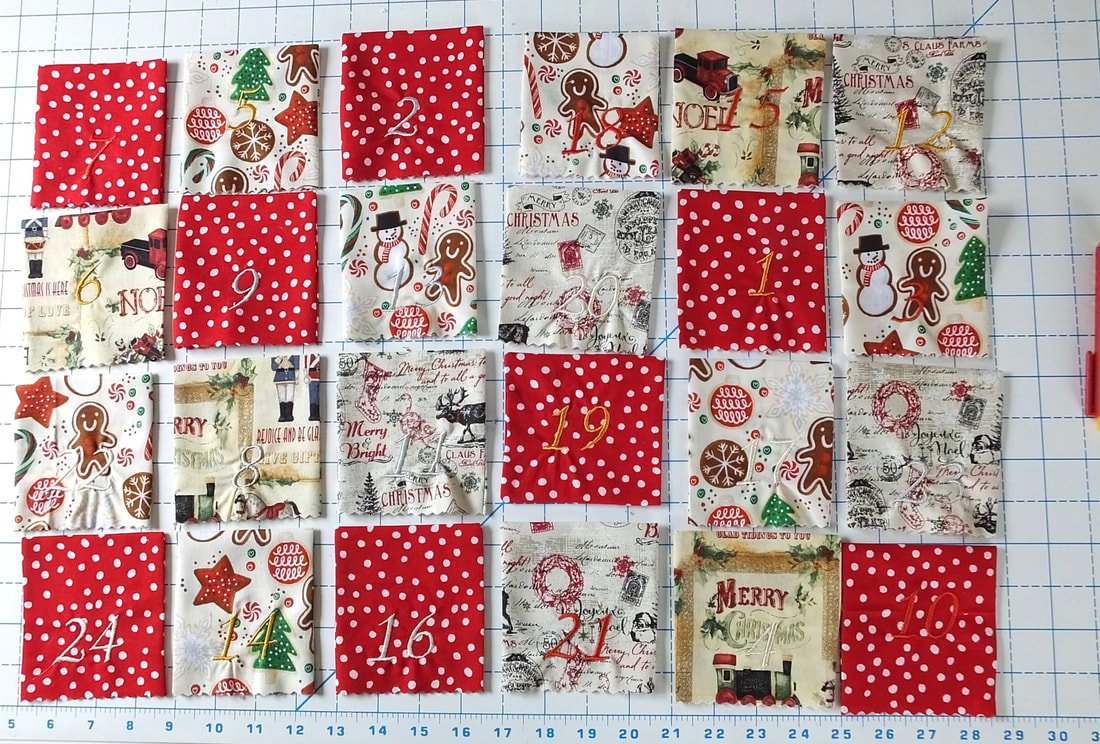
Arrange them in a horizontal way if you like that better.
I did this part backward, sorta. After laying the pockets out, I cut my fabric for them to be sewn onto. I measured the size of all the pockets and added 2" on each side. 5" to the top and 2" to the bottom. This allowed extra room for seams and the top to get turned down and stitched to create a loop for the wooden doweling.

I added length and width to the solid piece of fabric to sew the pockets onto.
I worked from the bottom up, sewing the bottom row of pockets first. You do what works best for you. :)

Measure from the bottom row of the pockets to see how much room you want.

Flip pockets the wrong side up and stitch along the open edge.
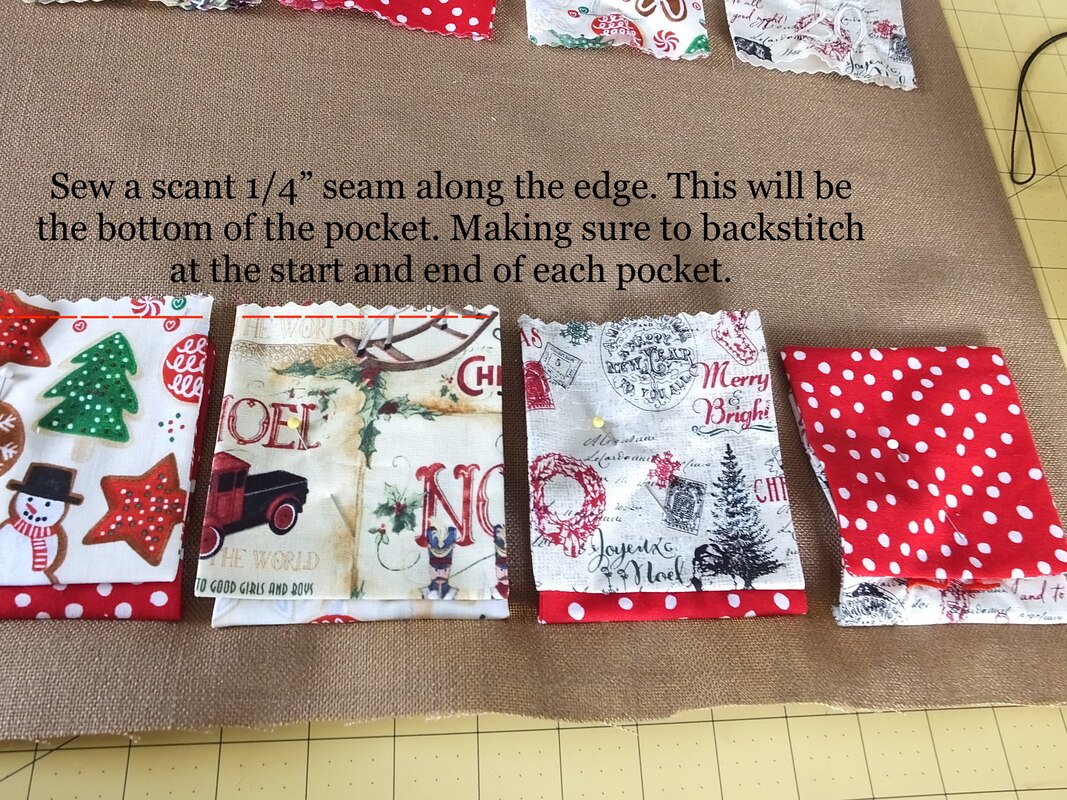
I sewed the second row 1/2" above from the top of the first row. You decide on your own spacing.
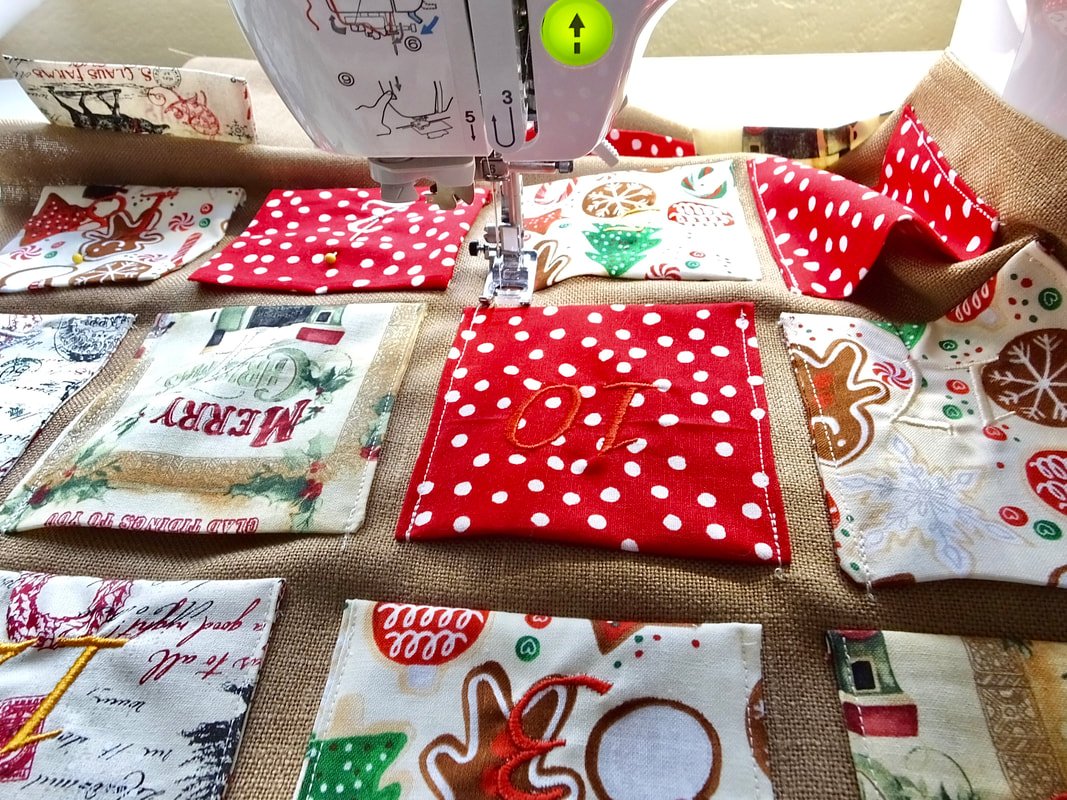
I decided to sew the bottoms of all the pockets on first. Then, I flipped them up to sew the sides. As you can see, I used pinking shears to keep the edges from unraveling. This whole project was on the fly and meant to be fun, without overthinking. Sometimes you just gotta sew something! LOL

Sewing the sides. Start from the bottom and go up, backstitch at the beginning and end.
Be sure to backstitch at the start and end of each pocket side. I also added extra stitching at the top where little hands will reach in and out to discover the treasures inside.
After you have all the pockets sewn on, it’s time to put it together.
Grab the backing fabric and pocket piece, and lay the pocket side RST on top of the backing fabric.
Pin or clip the pieces together, and sew a 1/2" seam allowance. Leave a 4"-5" gap at the top for turning. It’s a lot of fabric and layers so, you’ll want a nice size gap for turning out.

It’s starting to come together and look like an Advent calendar now.

Leave an opening for turning.
Clip the corners and trim thread tails. Turn out and top stitch around the whole calendar.
Decide how big of a loop you need for your wood doweling to slide through, pin, and stitch to create the loop.
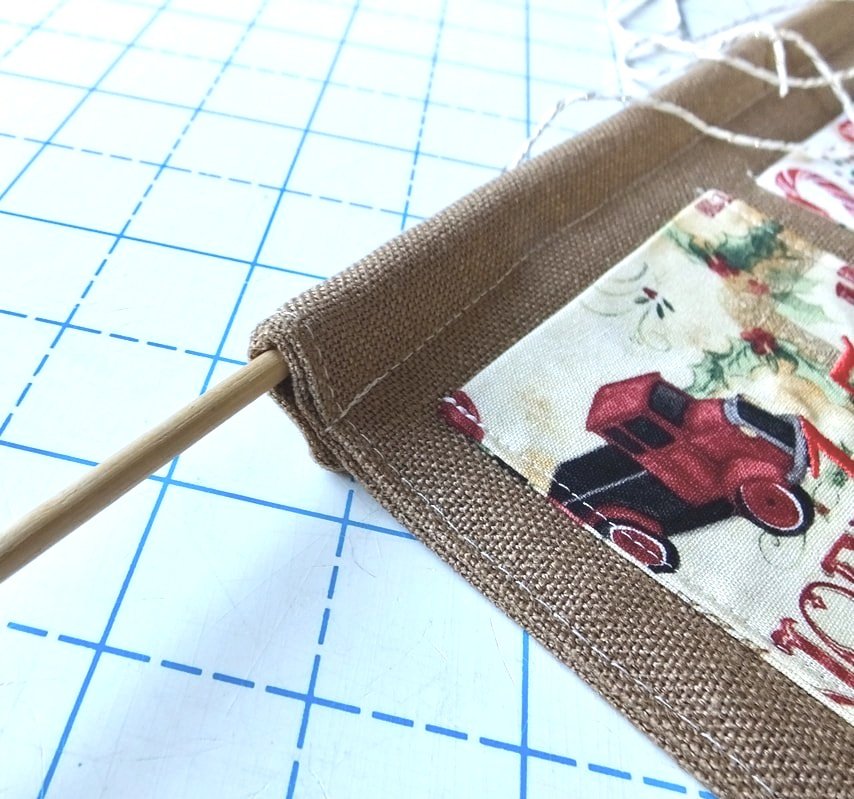
Slide the dowel through. Tie string or twine on each end with a double knot. Hang up and fill it with lots of little treasures.
You're done! Yay!!! Now, what do you fill it up with?
Filling it up
What are you going to fill the pockets with? Who is going to use the advent calendar? Little ones or big ones? I've listed some ideas below of what to put inside for all ages. Wrapping each item would make it extra fun and keep wandering eyes from peaking.
Chapstick or lipgloss
Fruit snacks
Small fruits, a tiny orange
Movie theater ticket
Handmade coupons
Small packs of beef jerky
Cash
$5 gift card
Hair elastics or barrettes
Small lego sets
Candy
Toy cars
Earbuds
USB stick
SD card
Crayons
Package of nuts
Hot cocoa packet
Socks
Soft gloves
Squishy toys
Stress ball
These are just a few ideas, the sky is the limit on fun little treasures. Just think of anything that will fit in the palm of a hand.
Well, I'm off to buy some items to fill our calendar with. If you think of other ideas, please share those in the comments below. The more ideas, the merrier! Are you going to make an advent calendar? Or make one as a gift? Let me know in the comments below.
Merry Christmas,
Annette